|
Baby Bassinet |
| Created Using Photo impact version XL
skill Level intermediate.
Author; Jane Davidson
Web site:
Jane's Haven.
Email:
Here
Terms of Use:
here
Tools used: Path tools, Path edit, Air Brush, Paint
brush, blue tool, type effect. Extra files needed; material for type
effect; here. Ribbon full
Here. |
 |
| |
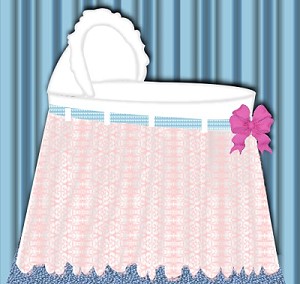
step 1. Open a new image size 525X625,
background color; I used #A0F794, you may use any color
you prefer to make it easier to see. |
|
 |
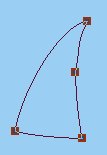
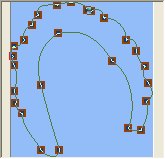
Step 2. The hood Side; using the ellipse;
color; white, size; 93X149, 2D. using the nodes to
adjust the shape as you see in the example at left.
step 2A, Inside hood; Again draw an ellipse size; 95X87,
same color, edit the shape as in the example. |
|

|
step 3.inside; With the ellipse size;
325X 37, white, edit the left side of the ellipse like
in the picture. |
|

 |
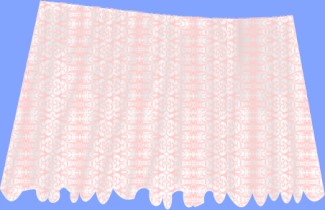
step 4. skirt; Using Plaque 5,
color white, size; any for now, flip it vertically
and using the perspective resize to:356X38 for the
top of the skirt. Path edit to edit the shape
like in the example. You may have to add nodes, |
|
 |
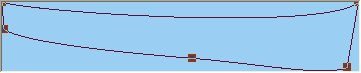
Step 5; Bottom skirt; Using the
rectangle, color white 2D, size; 346X234, place this
rectangle just below the last shape we made. Click on
the transform tool, perspective
 to pull the bottom outwards, Go into path edit, right
click on the top and convert to curve, edit this to fit
the shape above.
to pull the bottom outwards, Go into path edit, right
click on the top and convert to curve, edit this to fit
the shape above.click on the bottom, still in edit
mode, convert to curve, use the handles on each side and
push them slightly upwards to give it a rounded look. Add nodes
across the bottom and push some slightly up and pull
some down to make it look gathered. click on each side
and convert to curve. bring the node inward, just enough
to make a small curve on each side. Your gathers may
look different but that's ok. on the left is what I
have now, resized 60 percent. |
|
 |
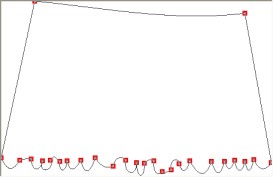
step 6, hood ruffle; draw an ellipse in
white, size;133X104, 2D, go into path edit to edit the
shape around the hood. Like in the example, add nodes on
the top and down around the sites pulling the handles
for make ruffles. See example at left. |
|
 |
Step 7. make a ribbon, Rectangle color;white,
I used a fill which you can download at the top of the page,
or use your own. size; 363X17, edit this so it fits
just above the top of the skirt. Step7A, loops; Using
the rectangle in white size; 10X23, duplicate it 3 times
and place them over the ribbon evenly. |
|
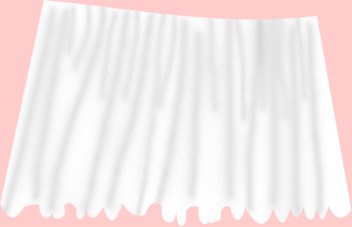 |
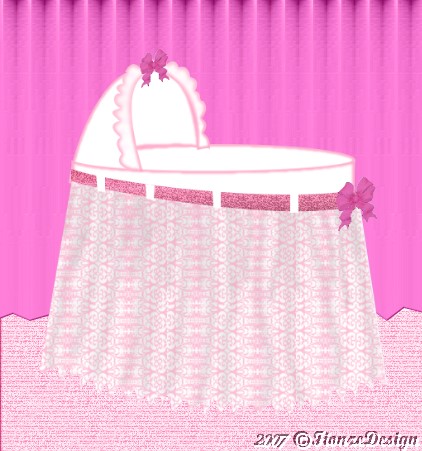
8. skirt shading; First, duplicate the
skirt, move the duplicate out into it's own window,
Select the skirt to make it active, right click and
convert to an image. Using the air brush with these
settings; size 20, soft edge; 50, color;#898686.
paint lines down the skirt, they don't have to be perfectly even, we want to make it look like it is gathered.
reduce the size of the air brush to;14, to make smaller gathers at the
top of the skirt, downwards but not all the way to the
bottom. Use the blur tool; size; 60. level;5, soft
edge;50, use a downward stroke to blend the lines. |
|
 |
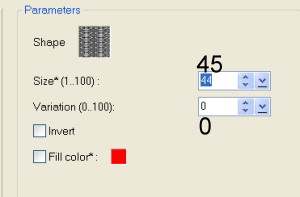
9.Skirt overlay. Move the duplicate back
on the main image over the skirt. fill this with a
different color, I used pink. Right click on the
duplicate, convert to an image. go to effects, creative,
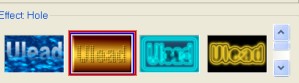
click on type effect, preset effect; hole, look to
the top right where it says shape, click it and browse
to where you saved the shape you downloaded from the
top of the page. At left you can see the settings. The
shape you see in the example may be a different one than
the one your using. |
|
 |
|
| Send this piece behind the ribbon and
loops. |
|
 |
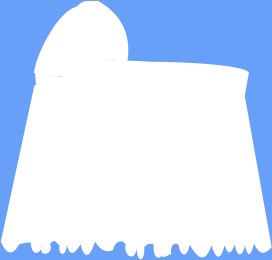
10. shading; Now select all of the
pieces, except, both skirts, ribbon and loops. set
the paint brush to; size 15, softedge;100,
color'#C6BFBF, go to effect, paint on edges. use the
airbrush with these setting; size;9, soft edge; 50 to
give the ruffles around the hood the effect of gathers.
use the blur tool to blend. completed! |
|
 |
After completing this Tutorial feel free to download
the award on the left.
This award is offered to you on the honor system. Right click and save
to your own folder. Please do not link to any of my graphics. Thank you.
|
|
 |
The Bassinet on the left was done by
Fiona
Thank you Fiona for doing a wonderful job. |
|

