|
What you make is yours. |
|
This is what
we are making
Reflective
Beauty
Paint Shop Pro
Tutorial
I used Version x8
but I am reasonably sure it can be done in many other
versions as well. You must have some knowledge of
Paint Shop Pro
by
Jane's Haven
Any Questions?
Contact Us.
Supplies you will need.
Font of your choice.
Plugin, Alien Skin Xenofex.Here
The bed tube came from
Here It is in the zip.
A tube of choice, the one I am using is the beautiful art of
Michael Landefeld, The web site I got it from is now closed.
Supplies
Open the mask in PSP. Add the preset shape to the preset shapes
folder.
Use My Fat Pencil to drag to the place you are in the tutorial.
 |
| 1. Open a new transparent image, size 600X600. Flood fill with color of
choice, I used, #e47b82. add the mask enclosed in the
zip and merge group. |
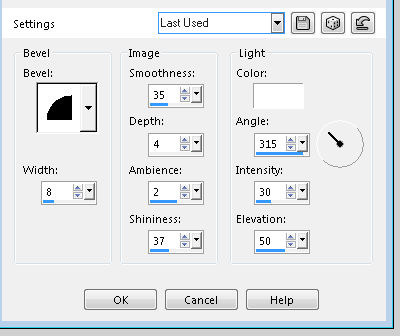
| 2. Using the preset shape
tool, find the shape named Tunnel, with these setting.
The color I used is a gold gradient for the foreground
and mull or the background, settings. linear,
angle, 90, repeats, zero. Center the shape in the middle
of the canvas, pull the sides out more. Convert to layer
add an inner bevel using the settings below.

 |
| 3.. Grab the magic wand,
click inside the tunnel frame, expand by 4, add a new
layer, flood fill with a silver gradient, linear,
angle,32, repeats, 0. Move this layer below the frame. |
| 4. Place the tube on the left, see mine, resize if
necessary, duplicate tube, move it over a bit to the
right so that some of the tube is on the mirror. change
the opacity to 44. If the legs of the tube is showing
below the mirror, use the eraser to remove This is the
reflection in the mirror. |
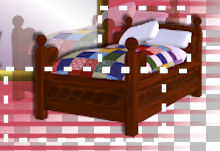
| 5. Place the bed on the lower
right allowing some of the bed on the mirror, duplicate
the bed, move it a bit to the left, this is the
reflection of the bed. Lower the
opacity to 44. Using the selection tool, rectangle, to
remove the bed reflection that is showing outside the
mirror. See illustrations below. Add a drop shadow to the
original bed. H, V, -2,
opacity, 72, blur, 3, black. Add a drop shadow to the
tube, same, except change to H and V to minus 2.
 |
| 6.Place the window on the right,
below the mirror and frame, add a drop shadow, H, V, 1,
opacity,72, blur, 3, black. |
| 7. Place the bow at the top center of the mirror,
place the flowers, one on each side of the bow. Add a
drop shadow, H, V, 1, opacity, 72, blur, 3, black. Merge
these three decoration tubes together, duplicate and
slide the three down a bit, change the opacity to, 44. |
| 8. Place the basket of flowers and stand at the center bottom
with the bouquet on the mirror, duplicate, with the
mover tool, move the bottom one over to the left a bit,
to make a reflection. |
| 9. Now is a good time to add your name and copyright
of the tube, if needed. |
| 10. Duplicate the tube, make it a bit smaller and
move to the right on the mirror. While on the duplicate
tube, select all, float and defloat, press the
delete key on the keyboard. keep selected. Duplicate
three times for a total of four. Close the top three
duplicate layers, highlight the one at the bottom. |
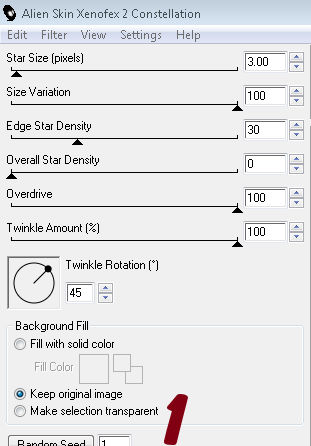
| 11. Open Alien Skin xenofex 2 go to constellation,
use the settings you see below. Open animation shop, In
Paint shop Pro go to edit, copy merged, back to
animation shop, paste as new animation. Back to
PSP, close off the bottom tube and open the next one
above,
open Alien Skin xenofex constellation, do not change any
settings, except click on the random button once. Copy
merged, go to animation shop, edit, paste after selected
frame. Repeat two more times.
 |
| 12. You should have 4 frames in animation
shop, select all the frames by holding down the control
key
and pressing the A on the keyboard, go to the menu
open frame properties, set the time to 20. Save as a
gif. |
©by Jane's
Haven all Rights Reserved Except Where Otherwise Stated.


