|
Bow Paint Shop Pro
Tutorial
Using Version 9, most
likely can be done in other versions as well.
by
Jane's Haven
Contact Us
Get my Selections
Here.
Selections for PSP
Version 7, here
Unzip them in a folder
of your choice.
Don't forget the save
often. |
| |
| 1.Open a new transparent image,
size;489X230. |
| 2.Add a new layer, name it, inside
bow. Load from selections, 1-insidebow sel, flood fill
with red or any color you wish, I used a red. Leave selected go to adjust,
brightness/contrast, use these settings. Brightness;
minus 48, contrast; 0, Now Deselect. |
| 3. Add a new layer, name it,
inside trim, load the 2-insidetrim sel. Flood fill
with a gold gradient. Deleselct. |
| 4, . Add a new layer, name it, out
side bow, load the 3-outsidebow sel. Flood fill with the
same color red. Deselect.
 |
| 5. . Add a new layer, name it, bow
end., load the 4-bowend sel, flood fill with the red.
Deselect. |
| 6.. Add a new layer, name it, out
side trim1, load the5-outside trim1 sel, flood fill with
a gold gradient. Dese;ect, |
| .7.Add a new layer, name it, out
side trim2, load the6-outsidetrim2 sel. Flood fill with
a gold gradient. Deselect. |
| .8. Add a new layer, name it, end
trim, load the 7-endtim1 sel. Flood fill with the gold
gradient. Deselect. |
| 9. Add a new layer, name it, end
trim2, load
the 8-endtrim2 sel. Flood fill with the gold
gradient amd Deselect. |
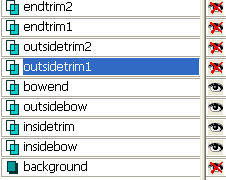
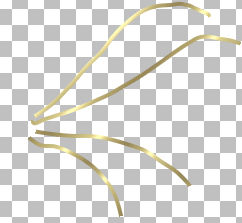
| 10. Merging; Hide the background
layer,all the trim layers, except the inside trim layer, by clicking on the
eye in the layer palette. Leaving the inside bow, out
side bow, bow end and inside trim, not
hidden. Your image should look like the one below.

Now, right click on
one of the open layers and merge visible. You can rename
this merged layer, right side. |
| 11. Open all the closed layers,
hide the layer we just merged and the background layer
and leave all the trim layers open. right click on one
of the open layers and merge visible. Rename; trim.
 |
| 12. Make all layers visible,
except for the very last layer at the bottom, this
should be your background layer. Activate your magic
wand see settings below.

On the layer palette, click on the
right side layer until it turns blue, now click on your
bow image with the magic wand, some where on the
background, not on the bow. You may have to click in two
places, make sure all of the bow has the so called,
marching ants all around. With the ants marching around
the bow, click on the trim layer in the layer palette
and hit your delete key a couple of times. This
will get rid of any trim hanging over the edge of the
bow.Deselect |
| 13. Keep the background layer
hidden and merge visible. Rename this merged layer;
right bow. While on the right bow layer, right click and
duplicate, got to image on the menu bar and click
mirror. Below is what you should have now.
 |
| 14.Add a new layer, name it knot,
load the 9-knot sel, flood fill with, I used a red and
white gradient, sunburst style, repeats 0,

You may have to move the right and left bows inward a
bit, with the mover tool. Deselect. |
| 15, Now you can merge visible and
export as a Picture Tube.

Above are Cellar's results, it is a beauty. what a
great friend you are Cellar. Thank you bunches. |
© by Jane's Haven. All Rights reserved except where otherwise stated.