


A Paint Shop Pro Tag Tutorial, named Broken Pieces

I used Paint Shop Pro 2019 version, any version will work.
What you creatis yours. Please do not use it in any nudity or xxx rated place. You are welcome use it in where ever xcept where I specified. Thank you.
You must have a working knowledge of Paint Shop Pro to create this Tag.
The tube I am using is created by, Amberly Berendson. You must have a license to use this art. You can purchase here
In the zip file you will find, a mask, the elements. Download Here
Any questions, email me above.
| 1. Open a new image size 700X700 transparent background. |
| 2. Select all, add a new layer, copy and paste into selection, paper JH-p14, select none. Open the mask in Psp minimize go to layers. choose, new mask layer from image, in the drop down menu find the mask that is in the zip and apply, merge group. |
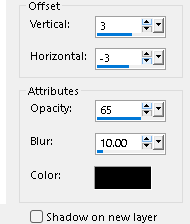
3. Next comes the gold frame, copy and paste as a new layer, resize using the pick tool set on scale, grasp the corners node and push inward. Add a drop shadow. See my settings below.
|
| 4. Using the selection tool set on point to point, start at the top of the frame, on the corner over to the next corner until the frame is selected. Add a new layer, copy, paper Mc_Syho_MayBlossomsp08.png , Paste into selection. Select none. |
| 5. Next, cut out a small portion of the frame edges. Using the freehand selection tool, on the edge of the frame, attempt to cut out a piece of the frame, after you cut it out, right click ,click cut, then deselect and click paste, as a new layer. You can do this as may times
as you wish. Also place the pieces where you wish. see
example. The image has been rotated.
|
| 6.It's time to add your tube, copy, paste as a new layer, place it on the right side of the frame. You may have to resize the tube, use your own measurements. If your tube has a large portrait image copy and paste as a new layer. Place below the left side under the frame, you can resize to fit nicely under the frame and to the left. IF your tube doesn't have a large image, use the selection tool, set on rectangle, make the selection around the head to use under the frame. See my example. Add a drop shadow to both tubes. |
| 7. Lets add some elements, copy and paste as a new layer, element Mc_SYHHO_MayBlossoms _E18.png. Place on the left under the frame, a drop shadow. |
| 8. Open, Mc_SYMO_MayBlossoms E06.png and elemen Mc_SYMO_MayBlossoms E01.png. Resize both 60percent. Copy and paste as a new layer, first is the E01, Place on the left, duplicate and mirror to place on the right side, at the top. Repeat this step with the E06, add a drop shadow. |
| 9. Copy and paste as a new layer ,Mc_SYHO_MayBlossoms E04.png and Mc_SYHO_MayBlossoms _E05.png, resize 60 percent, place both of them on the right edge, add a drop shadow. |
| 10. Copy and paste as a new layer, Mc_SYHO_MayBlossoms_ E16.png and Mc_SYHO_MayBlossoms_ E12 and E16.png, resize 60 percent, place on the top of the frame, add drop shadow. |
| 11.Copy and paste element, Mc_SYHO_MayBlossons-E26. Place on the left at the bottom, duplicate, mirror, place on the right, add drop shadow. |
| 12. Copy and paste element, Mc_SYHO_MayBlossons_E3, resize 50 percent, place on the top left, drop shadow, duplicate, mirror to place on the right. |
| 13. Copy and paste as anew layer, Mc_SYHO_MayBlossonsp_E33, resize 50 percent, place on the top left, duplicate mirror, place on the top right, drop shadow. |
| 14. Copy and paste as a new layer, Mc_SYHO_MayBlossons_E17.png, place on the top of the frame, drop shadow. |
| 15. Copy, paste as a new layer Mc_SYHO_MayBlossons_E28,s place at the bottom of the tag, resize 70 percent, drop shadow. Do the same with Mc_SYHO_MayBlossons_20E.phg. Continue until you are all the way across the bottom. |
|
Add the copyrights and name, save as a png.
I hope you enjoyed doing my tutorial, thank you. |

You can also contact me on Face book