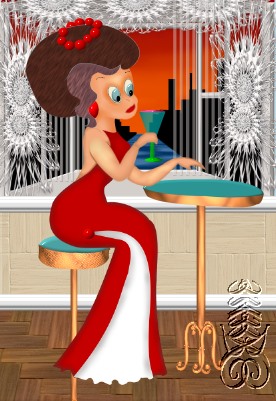
Cartoon Lady Tutorial
|
Created with Ulead Photo Impact.
PI
Version-I am using version XL, I am certain it can be done in
earlier versions, up to
PI12.
Skill Level: Intermediate
Author: Jane Davidson
Web Site: Jane's Haven
Email
Tools used; Path drawing tool, paint on edges,
blur, path edit, paint brush, air brush, dodge tool, blur tool,
burn tool, smudge tool. |
|
| |


 |
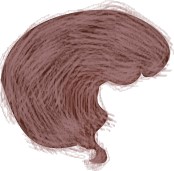
Step 24. I do hair a couple of different
ways, one way is to use the dodge tool to give it high lights. Right
click, convert to image, Use the dodge tool with the settings at left
and dodge around the middle of the darkest hair piece. Blur using the
settings at left. Change the color of the second hair to the same color
as the first, #59261B. Convert to an image, use the dodge tool with the
same settings except, change to size to; 20, lighten the inside and then
blur.
Note; This is only a guide line to help you get started, you can use
your own imagination. |
|

|
25. The other way is to use the Bristle Brush, preset, split 2, see
settings at left, I used color; #A27979, paint in mode,
 First
change both parts of the hair to the same colors, you may merge them if
you wish. First
change both parts of the hair to the same colors, you may merge them if
you wish. I started painting in the front and tried to follow the
contour of the hair on down the back of the hair to where it ends. By
painting in mode we can always use the eraser. Another suggestion is, if
you click out of mode, and deselect, then click back in mode to paint
again, you will create another layer, which is good because if you not
satisfied you can delete the layer. The example is 3 layers. Also, paint
in one direction not back a forth. As I said before, this is the way I
do it, there are other ways, maybe you can create another. I am not an
expert. :)) |
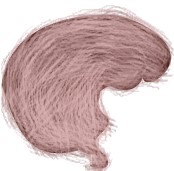 |
26. I used a lighter shade , #DBB3B3 to give it high lights, leave
some of the darker showing.
Use the smudge tool stay in mode, size 20, level 25, soft edge 50. Again going in one
direction until your satisfied.
stay in mode, size 20, level 25, soft edge 50. Again going in one
direction until your satisfied.
|
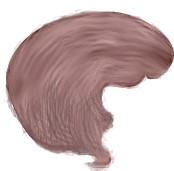 |
27, As I am not a good painter, I colored out side the lines, giggles, I
have to use the eraser to erase around the out side. Your will have to
select each layer to erase where it needs erasing. At left are my
results. Acadie's Art has a very good
tutorial on painting hair. |
|
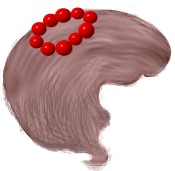 |
28. For the beads on the hair I just drew a 3D circle
in color red and placed them on top of the picture where the beads are
located. |
|
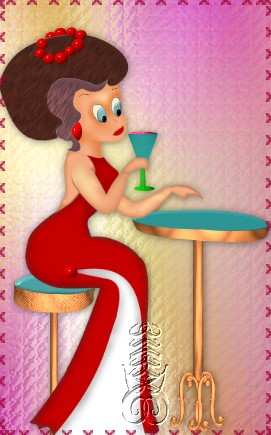
I'm not going on with the table and stool in this
tutorial, I am sure you can do that on your own. If you need help, you
can find my email address at the top of the page. |
|

|
After completing this Tutorial feel free to download
the award on the left.
This award is offered to you on the honor system. Right click and save
to your own folder. Please do not link to any of my graphics. Thank you.
|
|