|
Paint Shop Pro
Tutorial
I used Version x5
but I am reasonably sure it can be done in many other
versions as well. You must have some knowledge of
Paint Shop Pro
The tube I am using is from,
Keith Garvey, you
have to by a license.
by
Jane's Haven
Any Questions?
Contact Us.
Supplies you will need.
Filter's EyeCandy 4000
Font of your choice.
Supplies
Use My Fat Pencil to drag to the place you are in the tutorial.
 |
| 1. Open a new image size
650x550, flood fill with white. |
| 2. Add a new layer
flood fill with a color of your choice, I used
color-#8e9dc7, apply the mask imcluded in the zip, merge
group. |
| 3. Place the blue
ribbon, go to the menu image and free rotate, right, 90
degrees. Resize 40%, move to the left, duplicate, using
the pick tool, rotate a bit left. |
| 4. Open the flower, paste as a new layer, move to
the upper left over the ribbons. |
| 5.Place your tube on the right,
resize if needed. |
| 6.Animation, using the selection
tool, rectangle, select the water at the bottom. Go to
selections, promote selection to layer, duplicate three
time for a total of four. Close the top 3 by clicking on
the eye in the layer palette. Now high light the first
first layer of water. |
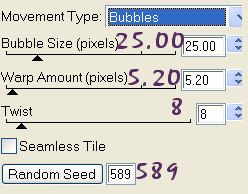
| 7. Open eyecandy 4000, jiggle, with these settings
below, click the ok button
|
| 8.Open animation shop, after you
have applied the jiggle, copy merged go to animation
shop and click the paste as a new animation. Go back to
PSP, close the water layer, open the next water layer
keep it high lighted, apply jiggle but click the random
seed button once. Copy merged, go to animation shop and
click paste after current frame. Repeat this until you
have four frames in animation shop |
|
9. High llight all frames by pressing
the control key plus the A key, go to frame properties
to set the speed to 10. |
| 10..If you are satisfied with your tag save as a
gif. |
©by Jane's
Haven all Rights Reserved Except Where Otherwise Stated.