|
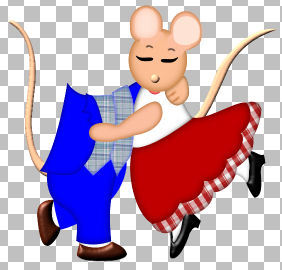
Dancing Mice Paint Shop Pro
Tutorial

I used Version 9
but I am reasonably sure it can be done in many other
versions as well. It ca, n not be done in Version 7,
Therefore I have selections for Version 7
Here, but
make the canvas size 600X557.
by
Jane's Haven
Contact Us
Terms of Use
Additional Files.
Get my Selections
Here.
Patterns
Here. |
| Open the patterns in your work
space. |
| 1. Open a new transparent image
size; 600X571. |
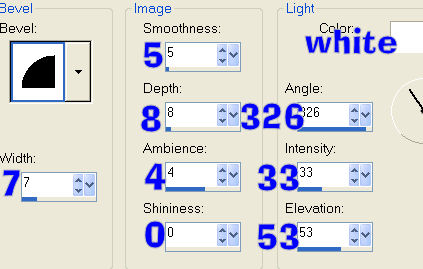
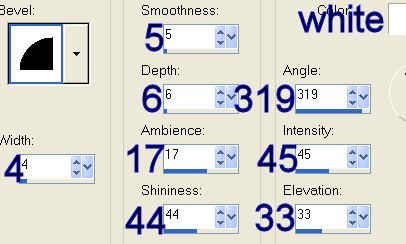
| 2. Add new layer, name it, boy
tail, load from disk; 01-boytail selection, flood fill
with; #fbbe95. Effects, 3D effects, inner bevel and
use the following settings. Deselect.
 |
| 3. Add new layer, name it, girl
tail, load from disk, 02-girltail Selection, flood fill
with the same color as for the boy tail and add the same
inner bevel. Deselect. |
| 4. Add new layer, name it, girls
socks, load from disk, 03-girlsocks selection, flood
fill with white. Float selection and add the following
cutout.
Vertical and Horizontal, 0
Opacity, 70
Blur,12.00
Color, Black
Deselect. |
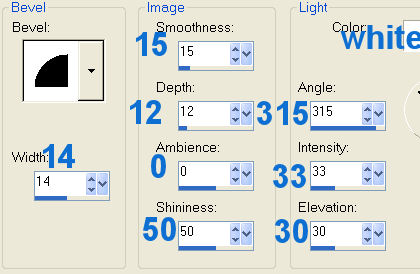
| 5.New layer, name it, girl shoe 1,
load from disk; 04-girlshoe1 selection, flood fill with
black. Add the following inner bevel. Deselect.
 |
| 6.Add new layer, name it, girl
shoe 2, load from disk the, 05-girlshoe2, flood fill
with black and add the same inner bevel as we did for
the first shoe. Deselect. |
| 7. New Layer, name it, boy socks,
load from disk the, 06-boysocks, flood fill with white.
Float and add the same cutout as in step 4 and deselect. |
| 8. New layer, name it, boy shoes,
load the, 07-boyshoes, flood fill with, #5e1c08. Add the
same inner bevel as in step 5, deselect. |
| 9. New layer, name it, right
lapel, load the,08-rightlapel selection, flood fill
with, #0000ff. Float selection and add the following cut
out.
Vertical and Horizontal, 0
Opacity, 100
Blur,12.00
Color, Black
Deselect. |
| 10. New layer, name it, dress top,
load from disk the, 09-dresstop, flood fill with,
#c00000. Float, add the following cutout.
Vertical and Horizontal, 0
Opacity, 100
Blur,15.00
Color, Black
Deselect |
| 11. New layer, name it, boys hand
1, load from disk the, 10-boyhand1, flood fill with,
#fbbe95. Float and add the following cutout.
Vertical and Horizontal, 0
Opacity, 100
Blur,12.00
Color, #593605
Deselect |
| 12. New layer, name it, boys hand
shading 1, load from disk the, 11-boyhandshading1, flood
fill with, #b65d22. Deselect and go to menu, adjust,
blur, average, setting of, 5. |
| 13. New layer, name it, girls
lower lip, load the, 12-girllowerlip, flood fill with,
#fd6f6f.Float add the following cutout.
Vertical and Horizontal, 0
Opacity, 100
Blur,7.00
Color, #9a0606
Deselect. |
| 14. New layer, name it, girls
head, load the, 13-girlhead, flood fill with, #fbbe95.
Float and add the following cutout.
Vertical and Horizontal, 0
Opacity, 100
Blur,25.00
Color, #994f07
Deselect |
| 15. New layer, name it, girls eye
brows, load the, 14-girleyebrows, flood fill with black
and deselect. Go to adjust, blur, average, seeing of 3. |
| 16.New layer, name it, girls eyes,
load the, 15-girleyes, flood fill with black and
deselect. |
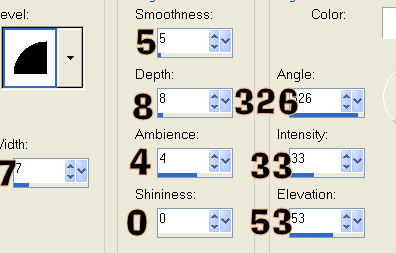
| 17. New layer, name it, girls
nose, load from disk the, 16-girlnose, flood fill with,
#fbbe95. Add the following inner bevel. Deselect.
 |
| 18. New layer, name it, girls left
ear 1, load the, 17-girlleftear1, flood fill with,
#fbbe9f. Float, add the following cutout.
Vertical and Horizontal, 0
Opacity, 100
Blur,14.00
Color, #994f07
Deselect
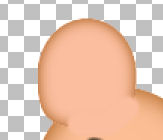
Next, use the paint
brush with the setting below, color, #fbbe9f to paint
the bottom part of the ear. See example below.

 |
| 19. New Layer, name it, girls left
ear 2, load the, 18-girlleftear2, flood fill with,
#fee2d4. Invert selection and add the following drop
shadow.
Vertical and Horizontal, 0
Opacity, 100
Blur,19.00
Color, #fbbe9f
Deselect and use the
mover tool to move it up a bit.
 |
| 20. New layer, name it, girls
right ear 1, load the, 19-girlrightear1, flood fill
with, #fbbe9f. Float
and add the following cutout.
Vertical and Horizontal, 0
Opacity, 100
Blur,14.00
Color, #994f07
Deselect
Using the paint brush
again with the same settings and color, paint the right
ear 1 at the bottom. |
| 21. New layer, name it, girl right
ear 2, load the, 20-girlrightear2, flood fill with,
#fee2d4. Invert selection
and add the same drop shadow as in step 19. Use the
mover tool to move it up a bit.
 |
| 22. New layer, name it, girls
dress trim, load from disk the, 21-girldresstrim, flood
fill with your own pattern, color, or use my trim
pattern provided. I used a setting of, angle; 128 scale;
50. Float and add the following cutout.
Vertical and Horizontal, 0
Opacity, 100
Blur,12.00
Color, #4c0202
Deselect |
| 23. New layer, name it, girls
skirt, load the, 22-girlskirt, flood fill with, #c00000.
Float and add the following cutout.
Vertical and Horizontal, 0
Opacity, 100
Blur,23.00
Color, #4c0202
Deselect. |
| 24. New layer, name it, boys pant
leg 1, load the, 23-boypantleg1, flood fill with,
#0000ff. Float and add the following cutout.
Vertical and Horizontal, 0
Opacity, 100
Blur,23.00
Color, #040666
Deselect. |
| 25. New layer, name it, boys pant
leg 2, load the, 24-boypantleg2, flood fill with the
same blue, #0000ff, Now float and add the same cutout as in the
last step. Deselect. |
| 26. New layer, name it, left vest,
load from disk the, 25-leftvest. Flood fill with the
vest fill pattern, changing the angle to; 0 and scale;
100 provided or one of your choice. Float,
add the following cutout.
Vertical and Horizontal, 0
Opacity, 100
Blur,10.00
Color, #353ef1
Deselect.
If you use a
different fill, adjust the color. |
| 27. New layer, name it, right
vest, load the, 26-rightvest, flood fill with the same
color as for the left vest, float and add the same
cutout and deselect. |
| 28. New layer, name it, boys
jacket, load from disk the, 27-boyjacket, flood fill
with, #0000ff. Float, add the
following cutout.
Vertical and Horizontal, 0
Opacity, 100
Blur,15.00
Color, #040666
Deselect. |
| 29. New layer, name it, left
lapel, load the, 28-leftlapel, flood fill with, #0000ff.
Float selection and add the following cutout.
Vertical and Horizontal, 0
Opacity, 100
Blur, 10.00
Color, #030567
Deselect. |
| 30.New layer, name it, girl arm
hand, load the, 29-girlarmhand, flood fill with,
#fbbe9f. Float selection, add the following cutout.
V and H, 0
Opacity, 100
Blur, 15.00
Color; #994f07
Deselect.
 |
| 31. New layer, name it, girl hand
shading, load the, 30-girlhandshading, flood fill with,
#b65d22. Deselect and go to adjust, blur, blur average,
use a setting of, 3. |
| 32. New layer, name it, boy hand
2, load the, 31-boyhand2, flood fill with, #fbbe9f.
Float and add the following cutout.
H and V, 0
Opacity, 100
Blur, 10.00
Color, #b65d22
Deselect. |
| 33. Add new layer, name it,
boy hand shading2,load the, 32-boyhandshading2, flood
fill with, #b65d22. Deselect and go to adjust, blur,
blur average, with a setting of, 3. |
| 34. New layer, name it, boy
sleeve, load the, 33-boysleeve, flood fill with,
#0000ff. Float and add the following cutout.
H and V, 0
Opacity, 100
Blur, 14.0
Color, #05075d
Deselect. |
| 35. New layer, name it, girls
sleeve, load the, 34-girlsleeve, flood fill with,
#c00000. Float and add the following cutout.
H and V, 0
Opacity, 100
Blur, 10.0
Color, #4c0202
Deselect; |
| 36. New layer, name it, boys head,
load the, 35-boyhead, flood fill with, #fbbe9f. Float
and add the following cutout.
H and V, 0
Opacity, 100
Blur, 20.00
Color, #994f07
Deselect. |
| 37. New layer, name it, boy right
ear, load from disk the, 36-boyrightear, flood fill
with, #fbbe9f. Float and add the same cutout as in the
last step, changing the blur to,13.00, deselect. |
| 38. New layer, name it, boys left
ear 1, load the, 37-boyleftear1, flood fill with,
#fee2d4. Invert and add the following drop shadow.
H and V, 0
Opacity, 100
Blur, 15.00
Color, #fbbe9f
Deselect. |
| 39. New layer, name it, boys left
ear 2, load the, 38-boyleftear2, flood fill with,
#fbbe9f. Float selection and add the following cutout.
H and V, 0
Opacity, 100
Blur, 15.00
Color, #994f07
Deselect and go to
the layer palette, hi-light this layer and drag it down
under the, boys left ear 1 layer.
Using the paint brush
with the setting below, color, #fbbe9f. On the layer
palette, hi-light the boys left ear 2 layer and paint
the bottom of the ear near his head. Now hi-light the
boys right ear and do the same. You may have to zoom in to
see.

 |
| 40.Hi-light the top layer. Add new layer, name it, boys eye,
load the, 39-boyeye, flood fill with black and deselect. |
| 41. New layer, name it, boys
eye brow, load from disk the, 40-boyearbrow, flood fill
with black. Deselect and go to adjust, blur, average,
use a setting of 3. |
| 42. New layer, name it, boys mouth
1, load the, 41-boymouth1, flood fill with, #ffc0ff,
deselect. |
| 43. New layer, name it, boys
mouth trim, load from disk the, 42-boymouthtrim, flood
fill with black and deselect. Go to adjust, blur,
average, use a setting of 3. |
| 44. New layer, name it. buttons,
load the, 43-buttons, flood fill with, #0000ff. Add an
inner bevel with the setting below.
Deselect, using
the layer palette drag the button layer down below the,
29-girlarmhand layer.
The End, I hope you
had fun. |
| 45. Instructions for saving: To
save as a tube, in the layer palette, right click and
click on merge, merge visible. If you want to add a
background, hide your background layer and then merge
visible, now you can open your background layer
and add a color, patter. picture or gradient. |
|
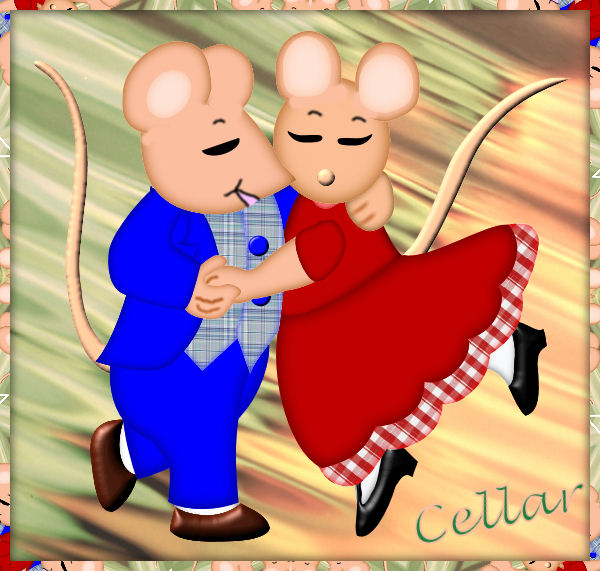
Thanks to Cellar for being my faithful tester. Excellent
results. |