
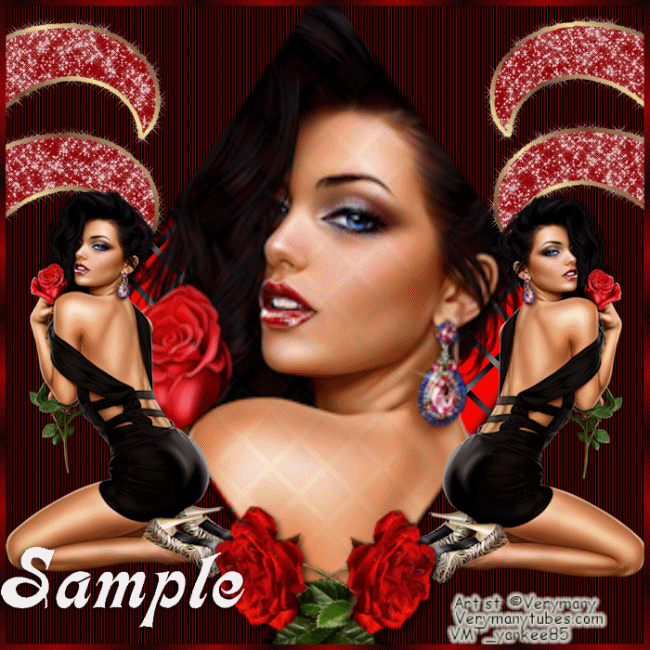
A Light In The Dark

This Paint Shop Pro Tutorial is strictly my creation. What you create is yours.
Supplies Needed.
A version of Psp, working knowledge of the program.
A Tube, the tube I am using is the Art of Very many. You can get a license from his store, here
You really need a tube with a close and a full body tube.
Unplugge effects filter, TV RGB In-line which you can download here, it is free.
VM Natural-Cross Weave, you can find here
Alien Skin Xenofex, constellation. Here
Put the preset shape in the preset shape folder
You can drag my fat pencil to mark where you are in the tut.
![]()
| 1. Open a new transparent image, size, 700X600. |
2. Flood fill with a color of choice, I used red, #800000 a color from my tube. |
| 3.Now go to effects unplugged effects, click on Tv RGB Inline. No need for settings. |
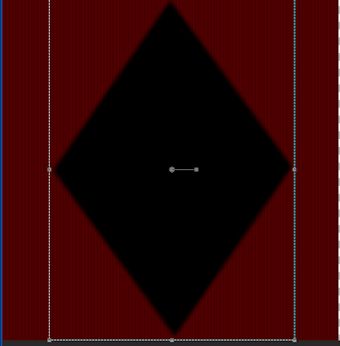
4. Grab the preset shapes tool find the JH-dia.Pspshape, in the material palette, the foreground is null and the background color, I used black, use any color you prefer. Drag out the shape, the top and bottom should be touching the top and the bottom of the tag, place in the center. Below is a small example. Convert to a raster layer.
|
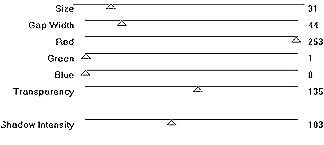
5. Activate your dia shape, select all float, defloat. Effects, find the filter VM Natural, then find cross weave, click it and use these setting. Deselect
|
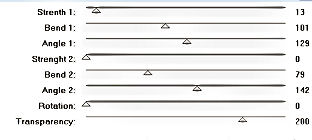
6. We are going to do something a bit different. Open a new transparent image, size, 300X300, flood fill, I used a red, go to effects, unplugged shapes, blobspikes, use the settings below. An example after using blobspike, don't deselect yet. Using the magic wand with tolerance set at 10, click inside the shape, go to the title bar of the image, copy, then past as a new image.
|
| 6. Copy the shape and paste as a new layer on to the tag image, this layer should be at the top of the layer palette. Place the shape to the far left, see my tag for placement. Duplicate and move this one up above the other shape, not touching, merge down, duplicate and mirror, line them up with the left shapes on the right. Merge all four shapes together. |
| 7. Activate the dia shape, select all float, defloat, add a new layer above the dia shape, grab your close up tube resize if needed and paste into selection, deselect. |
| 8. Find the full body tube and copy and paste as a new layer, place on the right side, you may have to re size the tube. Duplicate and mirror, on the left side. Add a drop Shadow, using these settings. H and V 2, opacity 70, blur 10, color black. |
| 9. Open the twin roses, copy and past as a new layer. Place them at the bottom center, add a drop shadow. |
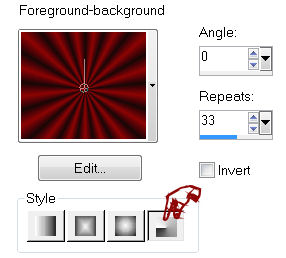
11. Lets add a border, click on the top layer in the layer palette, select all add a new layer, go to selections, then modify, select selections border, with a 5, in the material palette, the foreground should be a red, background layer, color black. Open the gradient, go to edit, click on, foreground background. With these settings, flood fill the border. Select none
|
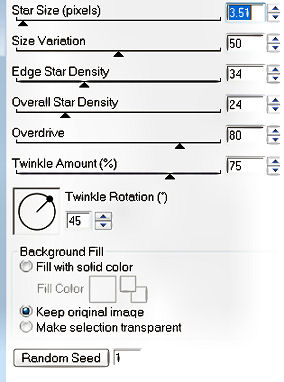
12. Back to the 4 curl shapes, using the magic wand, setting, tolerance, 22. feather zero, click inside shapes, make sure all are selected, expand 1. Now, add a new layer, flood fill the shapes, I used a red, #8e0506. Go to selections again and modify, select selections border with a setting of 4. Deselect and click inside again all the shapes again. On the layer palette, duplicate this layer 3 times for a tool of 4, now close all except for the bottom shape layer. Make sure the bottom shape layer is activated. Open Alein Skin Xenofex, constellation, with these settings.
|
| 13. After using the constellations, back to the layer palette, close the shape by clicking on the eye and open the nest layer up, open Alein Skin Exenofex constellation, it should have the same settings, do not change any except to click on the random button and then OK. Repeat this action two more times, each time clicking the random button. |
| 13. Add your name and any copyrights. |
14. Animation, open Animation Shop (AS). In the layer palette of PSP, click on the eye of all the shape layers except for the one at the bottom. Go to Edit or right click on the title bar of the tag and select, Copy Merged. Go to AS, paste as a new animation. Back to PSP, close the shape layer and open the next one above, copy merged, and back to AS, paste after current. Continue to repeat until all 4 layers are in AS as frames. Click to view to see your animated tag, set the frame properties to 10. Save as a Gif. |
| Thank you for trying my tutorials. |


You may use the banner for a link back to my site.