|

|
 |
|
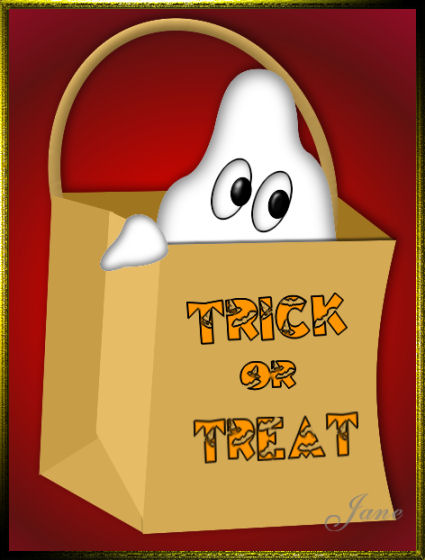
Ghost in a Bag
I used version 9, I
am reasonably sure, it can be done in other versions as
well.
by
Jane's Haven
Terms of Use.
Email
I am using
selections, you can get them
here.
Selections for PSP
Version 7,
Here
Don't Forget to Save
Often.
|
|
1.
Open a new transparent image size: 515X650. |
| 2. Add a
new layer, name it, bag back. Load from disk the,
01-bagback selection, flood fill with color; #d5aa55.
Deselect. |
|
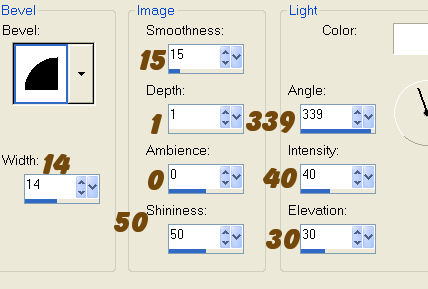
3.
Add a new layer, name it, handle. Load from disk the
02-handle selection. Flood fill with the same color
#d5aa55. Add
an inner bevel with the settings below. Deselect.
 |
| 4. Add a
new layer, name it, ghost. Load from disk,
03-ghost selection. Flood fill with white. Float
selection and add a cutout with the settings below.
Vertical and
Horizontal; 3
Opacity; 100
Blur; 27.00
Color; #808080
Repeat the cutout,
change the vertical and horizontal to minus 3. Deselect. |
| 5. Add a
new layer, name it, side bottom, load from disk the
04-sidebottom selection. Flood fill with; #d5aa55.
Deselect. |
| 6.Add a new layer, name it, front, load from disk,
05-front selection, flood fill with; #d5aa55. Deselect. |
| 7. Add a
new layer, name it, left side 1, load from disk the,
06-leftside1 selection, flood fill with; #d5aa55.
Deselect. |
| 8.Add a
new layer, name it left side 2. Load from disk the,
07-leftside2 selection. Flood fill with the same color
as the last step. Deselect. |
| 9 Add a
new layer, name it, hand. Load the, 08-hand selection,
flood fill with white. Float the selection and add a
cutout with the settings below.
Vertical and
horizontal; 3
Opacity; 100
Blur; 12.00
Color; #808080
Repeat the cutout
changing the vertical and horizontal to minus 3.
Deselect.
 |
| 10. Add a new layer, name it, left eye 1, load
from disk the, 09-lefteye1 selection, flood fill with
black. Go to selections, modify, contract by 2 and flood
fill with white. Float the selection and add a cutout
with the following settings.
Vertical and
Horizontal; 2
Opacity; 100
Blur; 120.0
Color; #808080
Deselect. |
| 11.Add a
new layer, name it, right eye 1, load from disk the,
010-righteye1 selection, flood fill with black, go to
selections, modify, contract by 2. Flood fill with
white, float selection and add the same cutout as the
last step. Deselect.
 |
| 12.Add a
new layer, name it,righteye2, load from disk the, 011-righteye1
selection. Flood fill with black, and add an inner bevel
with the following settings. Deselect.
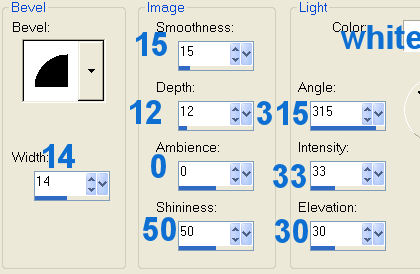 |
| 13.Add a
new layer, name it, left eye2 , load the, 012-lefteye2
Selection. Flood fill with black, add the same inner
bevel as in the last step. Deselect. |
| 14.Add a
shadow to the front, hi-light the front layer in the
layer palette. Add a shadow with the following settings.
Vertical;
minus3
Horizontal; 0
Opacity; 55
Blur; 2.97
Color; Black |
|
15. Shading; Click on the bag back layer in the layer palette
to hi-light the layer .
Go to Adjust,
brightness and contrast, use the following settings.
Brightness; minus 53, contrast; 0. |
|
16.Hi-light the left side 2 layer by clicking on it. Go
to adjust, brightness and contrast, set the brightness
to; 18, contrast to; 0. |
|
17.Hi-light the left side 1 layer, use brightness and
contrast, with the brightness set to; minus 18,
contrast; 0. |
| 18.To add
the text, add a new layer, name it text, load the,
013-text selection. Flood fill with black, go to
selections, modify, contract by 2. Flood fill with, I
used an orange, #ff9601.
You can merge
visible and save as a tube or hide the background layer,
merge visible, stand on the background layer
to flood fill with a color of
your choice.. |
|

I wish to
thank Cellar again for testing this for me. Your a great
Friend.
Her results
are Beautiful


© Jane's Haven, All Rights Reserved except Where Otherwise
|
|