|
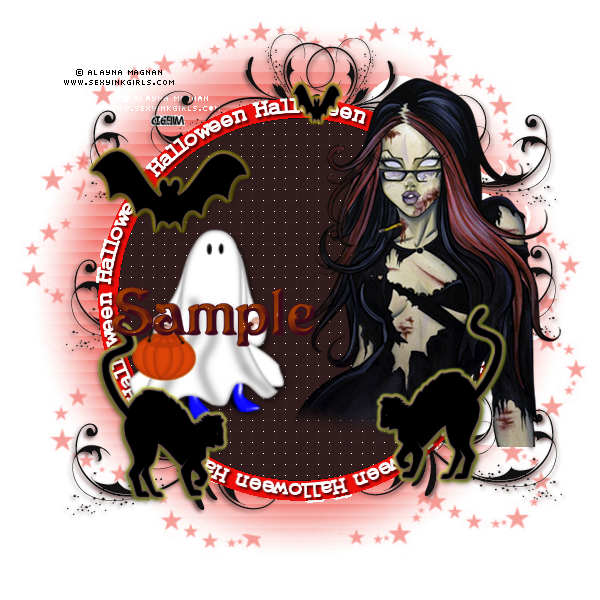
This is what we are making.
Paint Shop Pro
Tutorial
I used Version x8
but I am reasonably sure it can be done in many other
versions as well. You must have some knowledge of
Paint Shop Pro
by
Jane's Haven
Any Questions?
Contact Us.
Supplies you will need.
The tube store where mine came from no
longer exists.
The mask is included in the zip
Font of your choice.
No outside filters
Supplies
Use My Fat Pencil to drag to the place you are in the tutorial.
 |
|
|
|
What you create is yours |
|
1. Open a new transparent image, 600x600. |
|
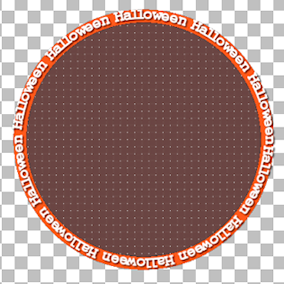
2. With the preset shape tool, circle, foreground
color, #ff4013, background color,#6a4745 or color of
choice, width 20. Draw a circle size, 800x800,
convert to raster layer. |
|
3. With the magic wand, tolerance 30, add shift, click
in the center, the center color of the circle, should be
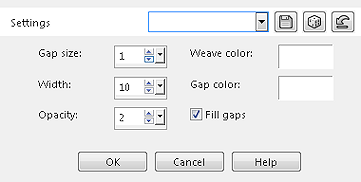
selected. Go to effects, texture, weave, use the
settings below. Deselect.
 |
|
4. Draw another circle, with the foreground color,
black, background color, null. Settings, line style,
straight line, width set at 1. Make the circle so it is
in the center of the orange color for the text. Go to
object, align, center on canvas, you can use the pick
tool to adjust the size. Leave it
as a vector. |
|
5. Using the text tool, material palette settings, background
color, #6b4846, foreground color, black, font I used is, Gungsuh and the size is, 20 pixels, stroke width
01, create as floating. With the text curser, place it on the top of the vector
circle. When you see the cursor change to a large A with
curved line under it, click and start typing,
Halloween, all the way around. I ended up using all
white text.
 |
|
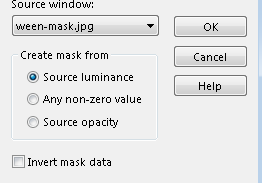
6. To add the mask, open in PSP, minimize, flood fill
the bottom layer with a color of choice, I used,
#f88074. Go to menu, layers, down the list to new mask
layer, from image, when the window opens, choose,
ween-mask.jpg. Merge group.
 |
|
7. Now we can start adding all the elements, your tube,
ghost, bats, cats, decorations. add a drop shadow if you
wish. |
|
8. If your tube is cut off at the bottom, grab the
eraser tool, size 50, hardness, 22, activate the tube
layer and erase the bottom not too far up. Add a drop shadow
to the deco after you place it under the circle. V, H, 2,
opacity, 100, blur, 6, color, #6b4846. duplicate and
mirror, merge the two, duplicate and flip, place at the
bottom, duplicate again and slide to the middle .Save as
a png or jpg. |
©by Jane's
Haven all Rights Reserved Except Where Otherwise Stated.