

In The Pink
Paint Shop Pro Tutorial
This tutorial was written by
Jane's Haven, I am sure
there are similar tutorials
but this one is from my own
head. Feel free to
make changes to any part of
my instructions.
Materials:
Paint Shop Pro any versions.
Animation Shop.
A tube or you can use mine,
my materials
HERE
Filters; Tramages-Tow The
Line. Get it
Here
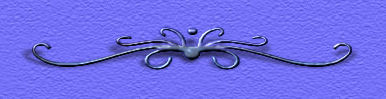
This is what we are
making.

|
1. Open a new
transparent image,
750x200 Pixels, fill
with white. |
|
2. With the color
picker, pick a color
from the tube, I
used, #eda9b7, flood
fill the image.
|
|
3. Select all,
add a mew layer,
copy the design-fill
image and paste into
selection. Merge
down. |
|
4. Open the tube2
image, copy and
paste as new layer,
move to the left. |
|
5. Open tube3, copy
and paste as new
layer, place in
position. |
|
6. Open tube4, copy
and paste as new
layer. |
|
7. Open the pink
rose tube, copy and
paste as new layer. |
|
8.Repeat step 7 with
the girl tube. |
|
9 Add a drop shadow
to the tubes,
I used, H and V-2,
opcity-76,
blur-5.00. |
|
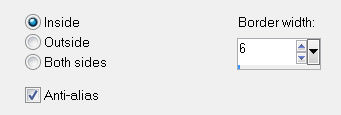
10. Select all, add a
new raster layer, go
to selections,
modify, Select
selections Border,
Settings below.
Flood fill with,
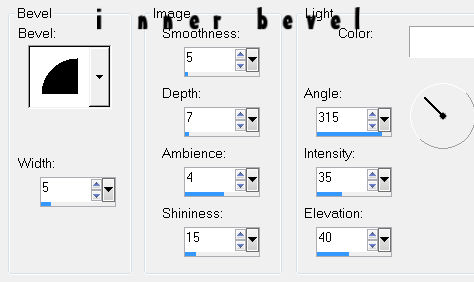
#eda9b7, Add an
inner bevel, see
settings below.
Deselect.
|
|
11. Click on
the pink layer, just
above the white
layer, duplicate
twice for a total of
3,
close off the
2 duplicate layers,
activate the first
pink layer. |
|
12. Open the tramage
filter, tow the
line, use the
default settings,
click ok. Close the
first tramage layer,
open the duplicate
layer, tramages, tow
the line, see
setting below. Open
the last layer and
use Tramage filter
one last time.
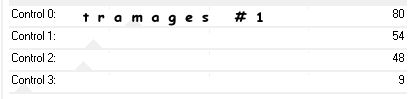
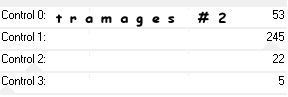
Control 0-237,
Control 1-249,
Control 3-80,
Control 4-71,
Deselect. |
|
13. Add your name
and any copyrights. |
|
14. If you are
satisfied with your
tag, in the layer
palette close the to
duplicate layers and
open the first
tramage layer , Go
to edit, copy
merged, open
Animation Shop,
edit, paste as new
animation. Back to
PSP, close the first
layer, open the
duplicate layer,
copy merged, In AS,
edit, paste after
current frame. In
PSP, close the
duplicate 2, Copy
Merged, back to As,
paste after current
frame. |
|
15. Still in As, go
to edit, select all,
frame properties,
set the time to 30
or what ever you
like. |
|
16. Save as a
gif. |
|
 |
 
|
|
|
|