|
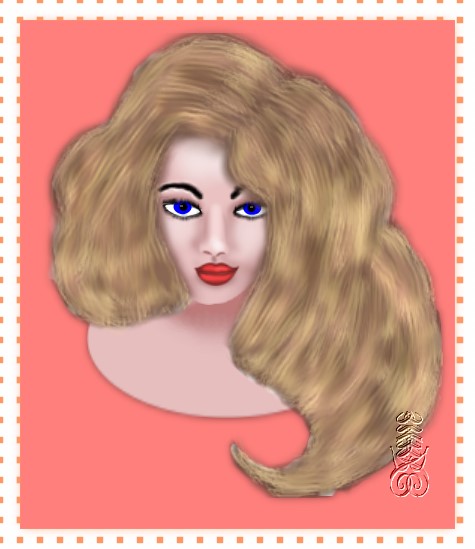
Lady portrait |
| Created Using Photo impact version XL
skill Level intermediate.
Author; Jane Davidson
Web site:
Jane's Haven.
Email:
Here
Terms of Use: here
Tools used: Path edit, path shapes, paint brush, air
brush, smudge tool, blur tool, dodge tool.
Additional files; None |
|
 |
|
I am
not an expert on creating faces, there are ,many
different tutorials but this is the one way I do them.
feel free to change any parts of this tutorial. |
| |
step 1. Open a new image size 450X510,
background color; white. you may use any color
you prefer to make it easier to see. |
|
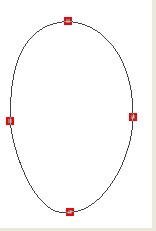 |
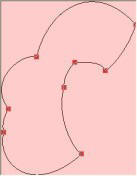
2, face: using the ellipse size:124X200,
2D, color;#EAC2C2. Go into path edit and edit the shape
like in the example at left.
Note: All drawn in 2D, except where otherwise stated |
|


|
3,eyes. Left eye; Using color white draw an
ellipse size; 39X18, 2D, got into path edit and make the
shape like the example. 3A, part 2 of eye; draw an
ellipse size; 19X15, color; #0000FF, any color you
desire. go again into path edit to make the shape like
the example.
3B, part3 eye, draw a circle, size;8x8 in color;
black. put them together with the white shape on the
bottom, next the blue one and then the black on top,
Using the paint brush size; 4, color; white, go into
paint as object. make a small white dot on the black part of the eye.
holding down the control key on your key board, select
all four pieces and group, duplicate and flip
horizontally, place the duplicate on the right side of
the face, this is a short cut. LOL
make a small white dot on the black part of the eye.
holding down the control key on your key board, select
all four pieces and group, duplicate and flip
horizontally, place the duplicate on the right side of
the face, this is a short cut. LOL |
|

 |
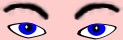
3C. eyes part 4 around the eyes. ungroup the
left eye, select the white part, duplicate, change the
color to black, send behind the white piece, use the
perspective, resize the duplicate to; 44x17 or until you
can see a small portion of black around the white, you
will have the center both. Repeat for the right eye. |
|
 |
4. eye brows; Use the paint brush, size;
5, color black, soft edge 50, paint an eye brow, you can decide the size you want your eye brows. to
make it easier and because this lady is looking straight
ahead, duplicate this brow and place it over the other
eye. I use the retouch-smudge tool, settings; size; 8,
level; 30, soft edge; 50, on the brows to make them look
somewhat even, they don't have to be perfect. don't forget to save. |
|

 |
5. Nose. Using shape; round edge 3, color;
##EAC2C2, size;39x53, flip it vertically, use path edit to
edit the shape as in the example. place it on the face.
using the paint brush, size;4, soft edge; 30, paint
the nostrils under the nose on each side. |
|

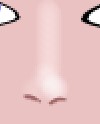 |
6, right click on the nose, convert
object type from text/path to image, use the dodge tool,
with the settings on the left, to lighten the center of
the nose shape, tap twice on the very point of the nose
at the bottom |
|


 |
7.lips; draw an ellipse size; 40x16,
color; I used,#B43434, path edit to edit the shape for
the top lip. Draw another ellipse the same size and
color for the bottom lip and edit it like in the example
7A.Lip shading; Select the lips one at a time, right
click, convert to an image. Set the paint brush size;5,
soft edge 50, color;#5D2121, holding the control key
down select both lips, go to effects, creative, paint on
edges. now use the blur tool setting; size 20, level; 5,
soft edge;50, to blur around the edges of the lips.
using the dodge tool, settings; size; 5, level; 62, soft
edge; 50, lighten the center of both lips |
|

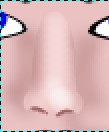 |
8.face shading; select the face,
right click, convert to an image, use the air brush with
the settings on the left. use it on each side of the
nose, from the eye to the end of the nose, to make the
nose stand out. select the nose and use the air brush,
same settings to air brush the edge of the nose to cover
the seams, use tje blur tool to lightly blur. |
| |
9. while you have the air brush with the
same settings, darken the area above the eyes, not all the
way up to the eye brows. A little shading under the
bottom lip, Change the size of the brush to 40 and paint
around the edge of the face. Change the size again to;
9, darken the space between the nostrils and the
lip, use the dodge tool, settings; size 5. level; 63,
soft edge; 50, run it along each side of where we just
did the air brush under the nose. lightly blur. |
|
 |
More shading, use the dodge tool
size;60, level 63. soft edge; 50, tap once on the left
side of the forehead and once on the right side of the
forehead and tap once just under each eye. At left is
what I have now, it is ok if your looks different, if
your satisfied, that is what counts. |
|


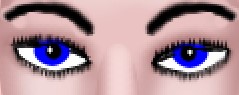 |
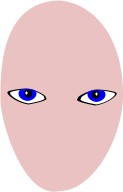
10. eye shading; paint in mode;
using the paint brush with the settings you see at the
left, color black. paint across the top of the eye lid,
on the white shape and on the the blue shape. you can
see what I am saying by looking at the image at left.
repeat this step for the other eye. stay in mode.
Change the size of the brush to; 2 and give her some eye
lashes, a very short line, or what ever size lashes you
want.
you may want to zoom in to see better. give her some
very short bottom lashes with a size of 1, use the
smudge tool, size;6, level; 30, soft edge;50 to lightly
smudge the lashes.
|
|
 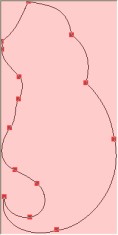 |
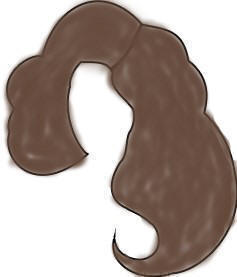
11. Hair, you don't have to follow my
instructions if you have a better way, you can use them.
draw and ellipse color; I used black, size; 150x279,
path edit and edit the shape as in the example. this is
the left side of the hair. draw another ellipse, same
color, size; 140x324, edit this shape like the one left,
which are reduced in size by 60% |
|
 |
On the left is what I have at this
point. sixty percent reduced in size. |
|
|
12. hair part two, use the bristle
brush, paint in mode, we are doing the right side of her
hair. settings, size; 14. transparency; 0, preset; split
2, color; #373737, follow the curves of the hair we
drew, on the out side, then fill in the middle, it won't
be completely coved, keep painting until your satisfied.
do the left side the same way. painting strokes
downwards. it's ok if you paint outside the lines, we
can always erase. change the color to; #6E6B6B, give
it highlights. Used the blur tool to blend the colors a
little. that is one way I do hair. |
|
 |
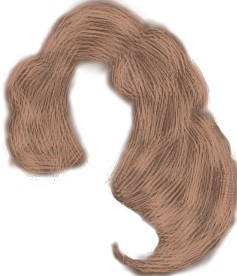
13. Hair another way, Change the hair
shape to 3D pipe, border and width to; 1, use the air
brush, any color you wish, I am using color; #654A3C
size; 30, soft edge; 0, paint in mode to fill inside the
3D pipe area of the hair shape. you can see mine reduced
size. you may delete the 3D pipe outline or hide it by
clicking on the eye in the layer manager. |
|
 |
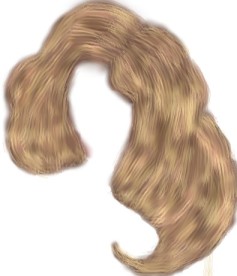
14. painting hair 2. paint in mode,
bristle brush, size around 30, transparency; 0, preset;
split 2, color; #C5987F. use downward strokes to go over
the air brushing. |
| |
15, blur the hair, using the blur tool,
settings, size;30, level; 2, soft edge, 50, paint as
object, this is mode the same as for painting. .
go over the hair with downward strokes. .
go over the hair with downward strokes.Note* while
using the blur took in mode, if you have a white
background, you could end up with the color white around
the edges, therefore we will use the eraser to get rid
of the white. |
|
 |
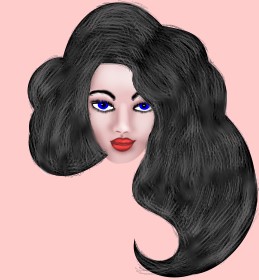
16. Smudge tool, grab the smudge tool,
size, 20, level; 21, soft edge; 50, preset; none, smudge
the entire hair. I used the dodge tool next, size;30,
level; 36, soft edge; 50 and added some highlights.
There is what I have, yours may look different, if
your satisfied your finished the hair. |
|
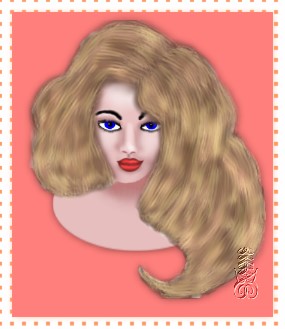 |
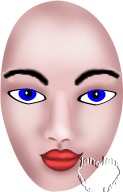
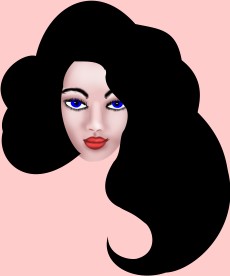
17. this is a portrait and we are almost finished. lets
add one more ellipse, size;280x159 color; #EAC2C2. place
it below the head and behind to head, move it up until
the top is just above the lips, to cover any spaces
between the hair and background. using the air brush,
size; 35, color; #AE7171, soft edge; 50, to darken the
area under her chin.
If your going to be using a darker background. you
may find some of the hair around the edges are too light
from the smudge and blur tool. use the eraser to
erase those spots. We Have completed our portrait. |
|
 |
After completing this Tutorial feel free to download
the award on the left.
This award is offered to you on the honor system. Right click and save
to your own folder. Please do not link to any of my graphics. Thank you.
|
|
|
|