|
Mouse in a Cup
Paint shop Pro Tutorial

by
Jane's Haven
Paint shop Pro
version 9 was used.
The selections
will not work with PSP V7,however you will find those
selections down below
Email
Terms of Use
This tutorial
uses selections, get them
Here.
Unzip into a
folder of your choice or your Paint Shop Pro selections
folder.
The gradient I
used,
HERE. Unzip and place in the gradient folder.
Selections for
PSP Version 7,
here.
The flower,
HERE.
|
| Step 1. Open a new transparent
image size 450X550. |
| Step 2. Add a new layer, name
it, handle, Load from disk the, 01-handle selection,
Flood fill with color;#65a0bc or color of choice. Float
selection and go to effects, 3D effects, cutout with the
following settings.
Vertical and Horizontal; 2
Opacity; 85
Blur; 15.00
Color;#064e6c
Repeat cutout
changing the vertical and horizontal to minus2.
Deselect. |
| Step 3.Add a new layer, name
it, cup back, load the, 02-cupback selection, flood fill
with the gradient provided, with settings, angle; 90,
repeats; 0 or your choice. Deselect and go to adjust,
brightness and contrast, set the brightness to; minue 70
and contrast to; 0. |
| Step 4. Add a new layer, name
it, back rim. load the 03-backrim selection. Flood fill
with a gold gradient. Float selection and add a cutout
with the following settings.
Vertical and
Horizontal; 2
Opacity; 95
Blur; 5.00
Color;
#776d2d
Deselect. |
| Step 5. Add a new layer, name
it, mouse head. load the 04-mousehead selection. Flood
fill with; #aea0a0. Float selection and add a cutout
with the following settings.
Vertical and Horizontal; 2
Opacity; 100
Blur;25.00
Color; #404040
Repeat the cutout
changing the Vertical and Horizontal to Minus2
Deselect. |
| Step 6. Add a new layer, name
it, mouse ears 1, load the, 05-mouseears1 selection.
Flood fill with;
#aea0a0, float selection, add a cutout with the
following settings.
Vertical and Horizontal; 2
Opacity; 74
Blur; 20.00
Color;#404040
Repeat the cutout
changing the Vertical and Horizontal to Minus2
Deselect.
 |
| Step 7. Add a new layer, name
it, inner ears, load the, 06-innerear selection. Flood
fill with color; #ffc0ff. Deselect. |
| Step 8. Add a new layer, name
it, eyes 1, load the, 07-eyes1 selection. Flood fill
with black, go to selections, modify, contract by, 1 and flood
fill with white, deselect. |
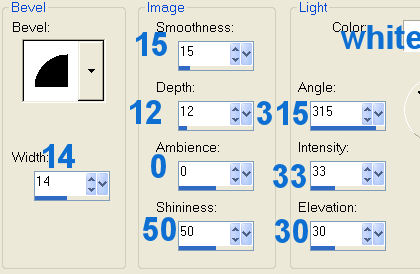
| Step 9. Add a new layer, name
it, eyes 2, load the 08-eyes2 selection, flood fill with
black. Add an inner bevel using the round preset, the
settings are below. Deselect.
 |
| Step 10. Add a new layer, name it,
cup front, lad the 09-cupfront selection. Flood fill
with the gradient provided for download, JH-darkaqua,
angle of; 90.
Invert selection and add a drop shadow with the
following settings.
Vertical and Horizontal; 0
Opacity; 100
Blur; 23.00
Color; #08507e
Deselect. |
| Step 11. Add a new layer, name it,
rim front, load from disk the, 010-rimfront selection,
flood fill with the same gold gradient as in step 4.
Float selection, and add the same cutout as in step 4.
Deselect.
 |
| Step 12. Add a new layer, name
it, right fingers, load the 011-rightfingers selection,
flood fill with; #aea0a0. Float selection and add a
cutout with the following settings.
vertical and horizontal; 2
Opacity; 95
Blur; 5.00
Color; #404040
Repeat the cutout
changing the vertical and horizontal to; minus 2.
Deselect. |
| Step 13. Add a new layer, name
it, left fingers, load from disk the, 012-leftfingers
selection. Float selection, Float selection and ad the same two
cutouts as in the last step. Deselect. |
| Step 14.Add a new layer, name
it, nose, load the 013-nose selection, Flood fill with
black and add the same inner bevel as in step 9, for the
eyes. Deselect. |
| Step 15. Add a new layer, name
it flowers, load the, 014-flowers selection, open the
flower you downloaded and click copy, click
on the main image and past into selection. Deselect.
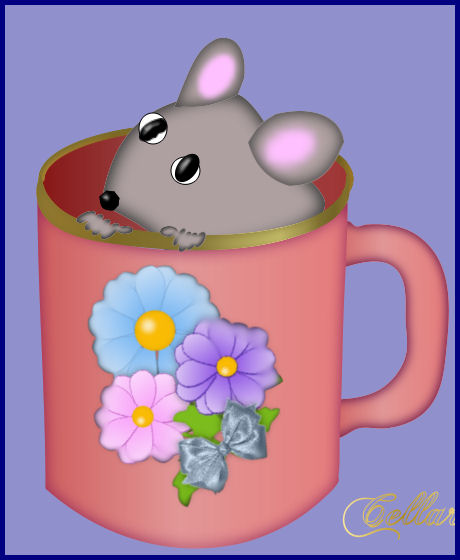
The little mouse in a cup is
complete.
You can right click on any layer
in the layer palette and merge visible. |
|
A Big Thanks to My Dear Friend
Cellar for her help with the tutorial again..

This one is Cellar's first version.
A nice treat to receive two versions. |