|
Mouse with
Umbrella Paint Shop Pro Tutorial
By Jane's Haven
Email
Terms of Use
Using Version 9,
but will work in many other versions as well.
We will be using
selection. You can get them
HERE.
The flowers
HERE.
Open the flowers image in PSP. |
| Step 1. Open a new transparent
image, size; 360X326. |
| Step 2. Add a new layer, name
it, left arm. load from disk, 01-leftarm selection.
Flood fill with color; #a49e9e, float selection and add
a cutout with the following settings.
Vertical and Horizontal; 2
Opacity; 100
Blur; 10.00
Color; #4e4444
Repeat cutout but
change the vertical and horizontal to minus 2.
Deselect.. |
| Step 3.Add a new layer, name
it, flowers, load the, 02-flowers selection. Click on
the flowers image, got to edit, copy, or right click on
the top of the flower image, not on the actual image and
click copy, click back on the
mouse image, go to edit, paste into selection, or right
click on the top, click on past into selection and
deselect. |
| Step 4. Add a new layer, name
it left hand, load the, 03-lefthand selection. Flood fill with
;#a49e9e. invert the selection and add a drop shadow
with the following settings.
Vertical and Horizontal; 0
Opacity; 86
Blur; 7.00
Color; Black
Deselect. |
| Step 5. Add a new layer, name
it umbrella back, load the, 04-umbrellaback selection, flood fill with
#980b0b. Deselect. |
| Step 6.Add a new layer, name
it, ear , load the 05-ear selection, flood
fill with color; #a49e9e. Float the selection and add a
cutout with the following settings.
Vertical and Horizontal;2
Opacity; 100
Blur; 20.00
Color; #4e4444
Repeat the
cutout, changing the vertical and horizontal to minus 2.
Deselect |
| Step 7. Add a new layer, name
it, head, load the, 06-head selection, flood fill with,
#a49e9e. Float the selection and add the same two
cutouts as in the last step. Deselect. |
| Step 8. Add a new layer, name
it bpdy, load the 07-body selection, flood fill with;.#a49e9e
Float selection, add a cutout with the following
settings.
Vertical and Horizontal; 2
Opacity; 100
Blur; 20.00
Color; #4e4444
Deselect
Repeat the cutout
using blur mius 20 |
| Step 9. Click on the body
layer, add a new layer, name
it, ear 2, load the, 08-ear2 selection, flood fill with
, #a49e9e. Float selection, add the same cutout as in
the last step, except, change the blur to, 11 and minus
11. Deselect.
|
| Step 10. Add a new layer, name
it, umbrella handle 1, load the 09-umbrellahandle1 selection, flood fill with black. Add an inner bevel
with the following settings. Deselect.
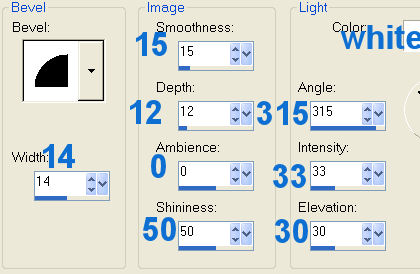
This is the Round Preset that was
included with PSP. |
| Step 11. Add a new layer, name
it,, left foot, load the, 10-leftfoot selection, flood
fill with color;
#a49e9e. Invert selection, add a drop shadow with the
following settings.
Vertical and Horizontal; 0
Opacity; 67
Blur; 14.00
color; Black
Deselect. |
| Step 12. Add a new layer, name
it, tail, load the, 11-tail selection, flood fill with
color ;#a49e9e.
Invert selection, add a drop shadow with the following
settings.
Vertical and Horizontal; 0
Opacity; 62
Blur; 8.00
Color; Black
Deselect. |
| Step 13. Add a new layer, name
it, umbrella front, load the 12-umbrellafront
selection. Flood fill with color; #c40000. Deselect. |
| Step 14. Add a new layer, name
it, eyes 1. load the, 13-eyes1 selection, flood fill
with black, go to selections, modify, contract by 1.
Flood fill with white and deselect.
|
| Step 15. Add a new layer, name
it, eyes 2, load the 14-eyes2 selection. Flood fill with
color; black. Add an inner bevel with the same settings
in step 10. Deselect. |
| Step 16. Add a new layer, name
it, right leg, lad the, 15-rightleg selection, flood
fill with, #a49e9e.
Invert selection and add the following drop
shadow.
Vertical and Horizontal; 0
Opacity; 67
Blur; 14.00
color; Black
Deselect |
| Step 17. Add a new layer, name
it, mouth, load the, 16-mouth selection, flood fill
with black. Deselect. |
|
Step 18. Add an new layer, name it,
umbrella handle 2, load from disk the,
17-umbrellahandle2 selection, flood fill with black.
Add the same inner bevel as in step 10. Deselect. |
|
Step 19. Add a new layer, name it,
right arm, load the 18-rightarm selection, flood fill
with color; #a49e9e, invert selection and add a drop
shadow with the following settings.
Vertical and Horizontal; 0
Opacity; 67
Blur; 14.00
Color; Black
Deselect. |
|
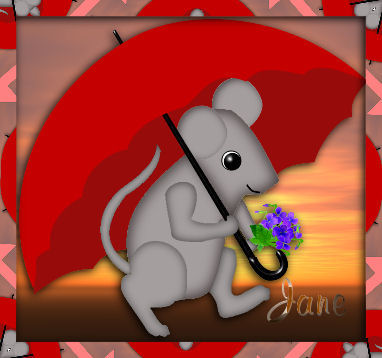
The mouse is
complete. Now, you can merge visible and save as a tube
or hide the background layer, which is the very last
layer in the layer palette, at the bottom, and merge
visible. Use your flood fill tool to fill the background
with a color or pattern of your choice.
|
|
A Big Thank You
to Cellar for doing the Testing once again for me. Above
is her Beautiful Results. |
©By Jane's Haven, All Rights Reserved, Except Where Otherwise
Stated.


