|
Mr. Valentine
Paint Shop Pro
Tutorial

I used Version 9
but I am reasonably sure it can be done in many other
versions as well. Except for version7, you can download
them, Here
by
Jane's Haven
Contact Us
Terms of Use
Get my Selections
Here.
The pattern fill
Here.
|
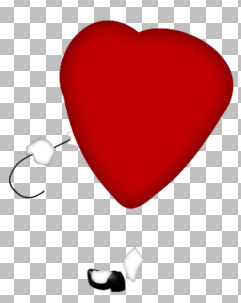
| 1. Open a new transparent image
size; 400X400. |
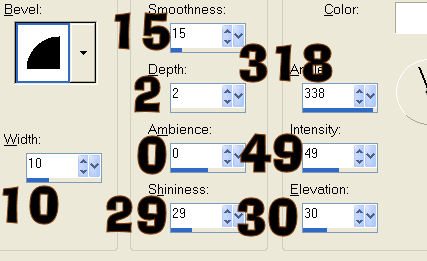
| 2. Add new layer, name it;
cane, load from disk the; 01-cane selection. Flood fill
with black , keep selected and add the following inner
bevel. Deselect.
 |
| 3. Add new layer, name it, left
shoe 1, load from disk the; 02-leftshoe1, flood fill
with black and add the same inner bevel and deselect. |
| 4. Add new layer, name it, left
shoe 2, load from disk the; 03-leftshoe2, flood fill
with white Invert selection and add the following drop
shadow.
Vertical and Horizontal; 0
Opacity; 50
Blur; 7.00
Color; Black
Deselect. |
| 5.Add new layer, name it, right
shoe1, load from disk the; 04-rightshoe1, flood fill
with white, invert and add the same drop shadow as in
the last step. Deselect. |
| 6.Add new layer, name it, right
hand, load from disk the; 05-righthand. flood fill with
white. Invert and add the following drop shadow.
Vertical and Horizontal; 0
Opacity; 70
Blur; 7.00
Color; Black
Deselect |
| 7.Add new layer, name it, left
hand, load the; 06-lefthand, flood fill white. Invert
and add the following drop shadow.
Vertical and Horizontal; 0
Opacity; 70
Blur; 3.00
Color; Black
Deselect. |
| 8. Add new layer, name it, top,
load the; 07-top, flood fill with; #c00000. Float
selection and add the following cutout.
Vertical and Horizontal; 0
Opacity; 100
Blur; 31.00
Color; #760404
Deselect, in the
layer palette duplicate this layer, add the same cutout. Name
this layer top 2.
|
| 9. Add new layer, name it, eyes
1, load the; 08-eyes1. flood fill with black. Go to
selections, modify, contract by 1, flood fill with
white. Deselect. |
| 10.Add new layer, name it, eyes
2, load from disk the, 09-eyes2 selection, flood fill with black. Add the same inner bevel as in
step 2. Deselect. |
| 11. Add new layer, name it, eye
lids, load the, 10-eyelids selection, flood fill with;
#c00000. Float and add the following cutout.
Vertical and Horizontal; 0
Opacity; 100
Blur; 10.00
Color; #760404
Deselect. |
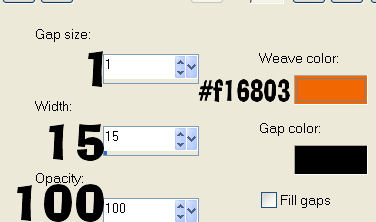
| 12.Add new layer, name it, hat
top, load the, 11-hattop, flood fill with; #7e3901. Keep
selected now go to effects, Texture effects, weave and
use these settings.
Float selection
and add a cutout with the settings below.
Vertical and Horizontal; 0
Opacity; 100
Blur; 7.00
Color; Black
Deselect. |
| 13. Add new layer, name it, hat
trim, load the, 12-hattrim selection, flood fill with, I
used a two color green gradient, linear, angle; 90,
repeats; 0. Deselect. |
| 14. Add a new layer, name it,
hat brim, load the, 13-hatbrim, flood fill with,
#7e3901. Keep selected, go to effects to add the same
texture effects, weave, with the same settings as in
step 12 for the hat top. Now float and add the same
cutout as we did in step 12. Deselect. |
| 15. Add new layer, name it, hat
brim edge, load the, 14-hatbrimedge, flood fill with,
#7e3901. Add an inner bevel with the settings below.
Deselect.
 |
| 16. Add new layer, name it,
arm, load from disk the, 15-arm selection, flood fill
with the pattern1 provided, use an angle of; 0. scale;
100 or you can use one of your choice. Float selection
and add a cutout with the settings below.
Vertical and Horizontal; 0
Opacity; 100
Blur; 15.00
Color; #0c1bac
Deselect. |
| 17. Add a new layer, name it,
left pant leg, load from disk the, 16-leftpantleg, flood
fill with the pattern1. Float selection and add the same
cutout as we did for the arm. Deselect. |
| 18. Add new layer, name it,
right shoe 2, load from disk the, 17-rightshoe2
selection, flood fill with black. Add an inner bevel
with the following settings. Deselect.
|
| 19. Add a new layer, name it,
right shoe buttons, load the, 18-rightshoebuttonns from
disk, flood fill with black. You may have to zoom in to
see and add the same inner
bevel as above and deselect. |
| 20. Add new layer, name it,
right pant leg, load from disk the, 19-rightpantleg
flood fill with the pattern1. Float and add the same
cutout as in step 16. Deselect.
Completed. |
| To save as a tube, right click
on one of the layers, merge visible. To Add a
background, hide the very last layer at the bottom,
right click and merge visible. To add tubes, etc. Add
new layers. |
|

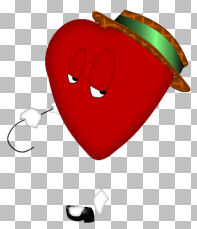
Here is Cellar's results, very well
done Cellar. Thanks for testing it for me. As you can
see Cellar has changed some colors, so feel free to do
your own thing. |
© by Jane's
Haven. All Rights Reserved, except where otherwise stated.