|
Paint Shop Pro
Tutorial
I used Version x5
but I am reasonably sure it can be done in many other
versions as well. You must have some knowledge of
Paint Shop Pro
The tube I am using is a Free Tube,
don't remember where it was from
by
Jane's Haven
Any Questions?
Contact Us.
Supplies you will need.
Font of your choice.
Supplies
Use the Fat Pencil below to keep track of
where you left off, just drag.
 |
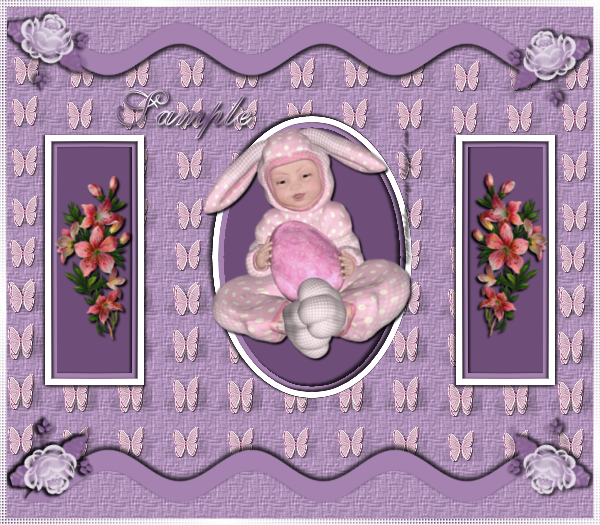
| 1. Open the background. |
|
2.This is the center solid piece.
Access the preset shape tool, ellipse, in the material
palette, background color of choice, I used, #6e4e78,
foreground closed. Draw out an ellipse size, 202X284, go
to object at the top menu, then, Align, center on
canvas. Convert to raster.
 |
| 3.Still working on the center frame, Access the
ellipse again, this time close the background color,
open the foreground, change the color to a color of your
choice, I used, #a582b0,set the with to 5. Draw out
another ellipse to fit on the outside of the oval frame,
convert to raster. Add a drop shadow. |
| 4.Center frame, select the ellipse tool once more,
foreground color white #ffffff, close the background in
the material palette. set the width to 5, draw another
ellipse to fit around the last one we made, convert to
raster, add a drop shodow. The middle frame is complete. |
| 5.Working on the left side frame, select the preset
shape tool, this time choose the rectangle. Go to the
material palette, close the foreground, open the
background, color of choice, I used
#6e4e78 draw a rectangle size, 101X252, place on the
left, align up with the oval middle frame, convert to
raster and add a drop shadow.
 |
| 6.Still working with the left side frame, select the
rectangle shape tool, with these settings, background,
closed, foreground color #a582b0, width 5, draw the
rectangle, size 93X244. adjust it around the outer edge
of the frame, convert to raster. Add a drop shadow. |
| 7. Draw one more rectangle, change the foreground
color to white #ffffff, width 109X259, again, place it
around the last frame we created, convert to raster. Add
a drop shadow. |
| 8. One by one, duplicate all the rectangles and
mirror each one to the right side, adjust and align them
up with the left side frame. |
| 9.Add the flowers included in the zip and the bunny
baby in the middle frame. add a drop shadow. |
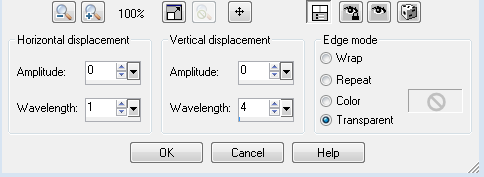
| 10. Select the shape tool, rectangle, background
color,#ad8fb6, foreground closed. At the top draw a long
rectangle. Go to the menu, effects, distortions effects,
wave, with these settings. Add a drop shadow. This layer
is supposed to be at the top. Duplicate and flip, adjust
to your satisfaction.
 |
| 11. Open the rose, place it on the end of the layer
we just created, duplicate and mirror, duplicate and
flip, duplicate and mirror. |
| 12. To finish off, we can either, make a border
around the tag by going to selection, modify, select
selection border, set at 6, add a new layer at the top
of the layer palette, fill with a color of your choice. |
| 13. Or you can find a mask and to use on the
background, merge group. |
| 14. Add copyright if needed and your name. Save as a
ping. |
| |
©by Jane's
Haven all Rights Reserved Except Where Otherwise Stated.