|
Santa Paint Shop Pro
Tutorial
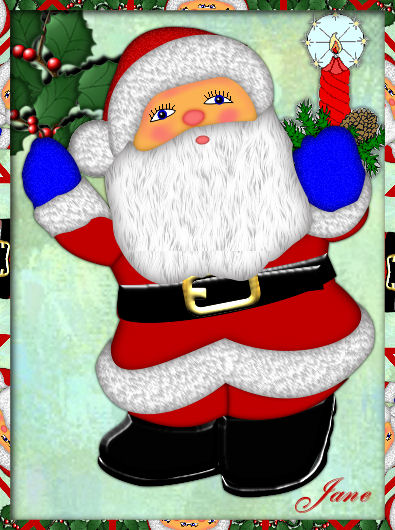
Using Version 9, most
likely can be done in other versions as well. Except
Version 7, you can download those selections,
Here.
by
Jane's Haven
Contact Us
Terms of Use
Get my Selections
Here.
Unzip them in a folder
of your choice.
Fur trim fill and
beard fill
HERE
Don't forget the save
often. |
|
Open both fill
patterns in PSP. |
| 1.Open a new transparent image,
size; 375X510 |
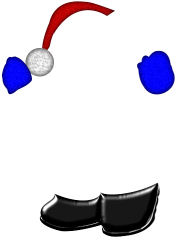
| 2.Add a new layer, name it, hat,
load from disk the, 01-hat selection, flood fill with
color; #c00000. Invert selection and add a drop shadow
with the following settings.
Vertical and Horizontal; 0
Opacity; 100
Blur; 13.00
Color; Black
Deselect and got to
adjust, add noise/remove noise, add noise with these
settings;
Uniform, 15,
Monochrome checked. |
| 3. Add a new layer, name it, hat
fur ball, load from disk the, 02-hatfurball. flood fill
with the white furm2 pattern, angle; 0, scale; 100.
Float selection and add a cutout with the following
settings.
Vertical and Horizontal; 2
Opacity; 100
Blur; 14.00
Color; #605c5c
Repeat the cutout,
changing the vertical and Horizontal to minus 2.
Deselect. |
| 4, Add a new layer, name it, left
mitten, load the, 03-leftmitten selection and flood fill
with color;#0000ff. Invert selection and add a drop
shadow with the following settings.
Vertical and Horizontal; 0
Opacity; 100
Blur; 13.00
Color; Black
Deselect and got to
adjust, add noise/remove noise, add noise with these
settings;
Uniform, 15,
Monochrome checked. |
| 5. Add a new layer, name it, right
mitten, load the, 04-rightmitten, flood fill with the
same color as the left mitten, invert and add the same drop
shadow and noise as we did in the last step. |
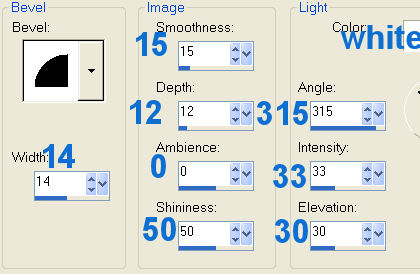
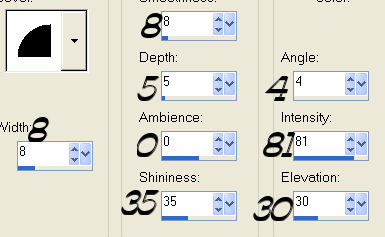
6. Add a new layer, name it, left
shoe sole, load the, 05-leftshowsole, flood fill with
black and add an inner bevel with the following
settings. Deselect....*Note; You can save this inner
bevel as a preset, when you open the inner bevel dialog
window, after you have the settings correct, click on
the save
 icon, give it a name you can remember and click ok.
 |
| 7Add a new layer, name it, right
shoe sole, load from disk the, 06-rightshoesole, flood
fill with black. Add the same inner bevel as in the last
step. If you saved the preset, open the inner bevel and
go to the top, where it says presets and find the one
you saved, Deselect. |
| .8. Add a new layer, name it, left
shoe, load the, 07-leftshoe, flood fill with black and
add an inner bevel with the following settings. Deselect.
 |
| 9. Add a new layer, name it, right
shoe, load the, 08-rightshoe selection and flood fill
with black and add the same inner bevel. Deselect.
 |
| 10. Add a new layer, name it,
right pant leg, load the,09-rightpantleg, flood fill
with color; #c00000, Invert selection and add a drop
shadow with the following settings.
Vertical and Horizontal; 0
Opacity; 100
Blur; 8.00
Color; Black
Deselect and got to
adjust, add noise/remove noise, add noise with these
settings;
Uniform, 15,
Monochrome checked. |
| 11.Add a new layer, name it, left
pant leg, load the, 010-leftpantleg selection and flood
fill with the same red color, invert, and add the same
drop shadow as we did for the right pant leg. Deselect,
add noise with the same settings. |
| 12. Add a new layer, name it,
coat, load the, 011-coat selection and flood fill with
the same color red. Invert selection and add the
following drop shadow.
Vertical and Horizontal; 0
Opacity; 100
Blur; 18.00
Color; Black
Deselect and got
to adjust, add noise/remove noise, add noise with these
settings;
Uniform, 15, Monochrome checked. |
| 13. Add a new layer, name it,
right sleeve, load the, 012-rightsleeve selection and
flood fill with the red color. Invert selection and add
the following drop shadow.
Vertical and Horizontal; 0
Opacity; 100
Blur; 6.00
Color; Black
Deselect and got
to adjust, add noise/remove noise, add noise with these
settings;
Uniform, 15, Monochrome checked.
 |
| 14. Add a new layer, name it,
left sleeve, load the, 013-leftsleeve, flood fill with
the same red color; #c00000. Invert and add the same
drop shadow as in the last step, except change the blur
to; 8.00
Deselect and got
to adjust, add noise/remove noise, add noise with these
settings;
Uniform, 15, Monochrome checked.. |
| 15. Add a new layer, name it,
face, load the, 014-face, flood fill with color;
#f8c39b. Invert selection and add a drop shadow with
the following settings.
Vertical and Horizontal; 0
Opacity; 100
Blur; 12.00
Color; #6d4505
Deselect. |
| 16. Add a new layer, name it,
face shading, load the, 015-face shading selection and
flood fill with color; #f97373. Click twice with your
bucket fill. Deselect. |
| 17. Add a new layer, name it,
eyes, load the, 016-eyes, flood fill with black. Go to
selections, modify, contract by 1, flood fill with
white. Deselect. |
| 18. Add a new layer, name it,
nose, load the, 017-nose selection, flood fill with
color;#f97373. Invert selection and add a drop shadow
with the following settings.
Vertical and Horizontal; 0
Opacity; 100
Blur; 6.00
Color; #c41414
Deselect. |
| 19. Add a new layer, name it,
hat trim, load the, 018-hattrim selection, flood fill
with the white fur pattern.
angle; 0, scale; 100..
Invert selection and add a drop shadow with the
following settings.
Vertical and Horizontal; 0
Opacity; 100
Blur; 17.00
Color;
#595353
Deselect. |
| 20. Add a new layer name it,
lashes, load the,019-lashes. Using the paint brush, with
the settings below, color black, to fill the lashes.
 |
| 21. Add a new layer, name it,
left sleeve trim, load the, 020-leftsleevetrim, flood
fill with the white fur pattern, angle; 0, scale; 100.
Invert selection and add a drop shadow with the
following settings.
Vertical and Horizontal; 0
Opacity; 100
Blur; 14.00
Color;
#595353
Deselect.
|
| 22. Add a new layer, name it,
right sleeve trim, load the, 021-rightsleevetrim, flood
fill with the white fur pattern, invert and add the same
drop shadow as in the last step. Deselect. |
| 23. Add a new layer, name it,
coat trim, load the 022-coattrim. flood fill with the
white fur pattern. Invert selection and add a drop
shadow with the following settings.
Vertical and Horizontal; 0
Opacity; 100
Blur; 17.00
Color;
#595353
Deselect.
Seems to be too
far to the left, grab the move tool
 to move it a bit
to the right. to move it a bit
to the right. |
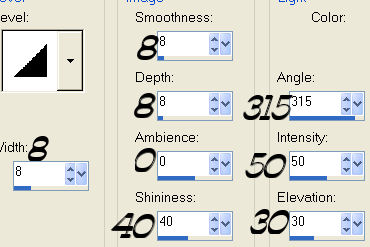
| 24. Add a new layer, name it, belt 1, load the,
023-belt1 selection and flood fill with black. Add an
inner bevel with the following settings. Deselect.
 |
| 25. Add a new layer, name it,
belt 2, load the, 024-belat2 selection and flood fill
with black. Add the same inner bevel as in the last
step. Deselect. |
| 26. Add a new layer, name it,
belt buckle, load the, 025-beltbuckle selection, flood
fill with a gold gradient and add the same inner
bevel as the last two steps. Deselect. |
| 27. Add a new layer, name it,
beard, load the, 026-beard selection, flood fill with
the beard fill provided, settings of, angle; 0, scale;
100. Invert selection and add the following drop shadow.
Vertical and Horizontal; 0
Opacity; 100
Blur; 25.00
Color;
#595353
Deselect.
In the layer
palette, find the hat trim layer and drag it up above
the beard layer.
|
| 28. Add a new layer, name it,
mouth, load the, 027-mouth, flood fill with color;
#f97373. Invert and add a drop shadow with the following
settings.
Vertical and Horizontal; 0
Opacity; 100
Blur; 4.00
Color; #700a0a
Deselect. |
| 29. Add a new layer, name it,
eyes 2, load the, 028-eyes2, flood fill with, I
used a dark blue color; #0000be, deselect. |
| 30, Add a new layer, name it,
eyes 3, load the, 029-eyes3, flood fill with black. Add
an inner bevel with the following settings. Deselect.
|
|
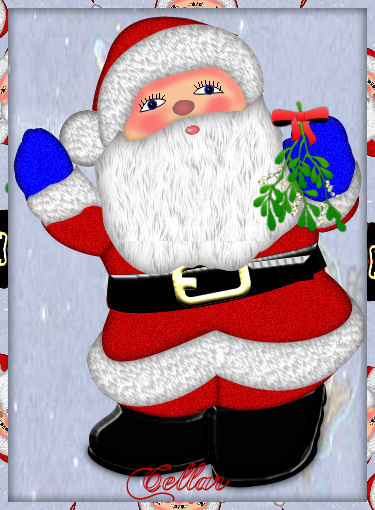
Santa is
complete.
To Save as a
Picture Tube, merge visible. To add a background, hide
the very last layer at the bottom and merge visible. |
|
Excellent work Cellar, You're a
Wonderful Friend and a Big Help to me. |
© by Jane's Haven. All Rights reserved except where otherwise stated.