
to my tutorials.

SexyGirl

I am using Paint Shop Pr2019, you can use any version, it will work.
You will need the se supplies:
A tube, the tubes I am using is by artist Ellie_Milk , love her work. You can purchase it at Pics For Design. Click on her name to have a look.
The scrap kit is by, 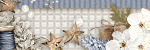 Dee's Sign Depot. Click the bling to have a looki at her outstanding goodies. Dee's Sign Depot. Click the bling to have a looki at her outstanding goodies.
This scrap is callled Tonay;s Gift and it is free. You may download Here, please go to here
website also. My suppies Here
| 1. 1.Open a new transparent image, size 700X700. Change the colorsin the material palette, foreground color,#cb98cc, background, #864386. |
| 2. Using the preset shpe tool, rectangle, the forground and background are as the above. set width on, 3. Draw out a rctangle appocimitly 250x250 pixels, go to layer palette, right click ahd choose, convert to raster, go to objects, center on canvas. |
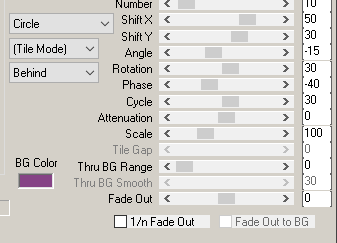
3. Open the filter, mura's meister copies with the setting below. On the bottom, you can find the presets, choose cards. When completed see the example below. You may have to adjust the size. postion it on the center and upwards.
4. Open the tube you are going to use, mine didn't have a larger profile picture, therefore, I used the largest tube, using the selection tool, rectangle to draw a rectangle around her
head and neak, Copy, on the tag canvas, paste as a new layer, postion on the far left of the image we used mura'scopies on. Before we merge the two, change the opacity to the tube image to, 52. Now merge down.

|
5. Open the bushes image, copy and paste as a new layer, place behined the cards image, add shadow. H and V; 2, opacity;60, blur; 3, color black |
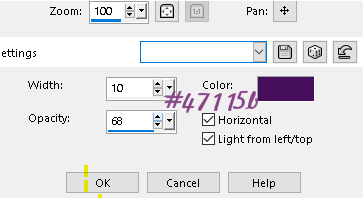
6. Next draw an elipse with the preset shapes tool, use the same colors, set the width to; 4. Postion below the card image, size, approximitly 600W x 250 lengh. Promote to layer, select none. I wanted a texture for the ovel, go to effects, texture, blinds, using the setting ypu find belolw.
|
| 7. Copy and paste as a new layer, element 14, resize 50%, place on the upper right corrner, add a drop shadow, duplicate 3 times, one for each corner. |
| 8. Copy and paste as a new layer, element; 19, resize 30%, place on the left, add drop shadow. |
| 9. Element 35 resize 60%, mirror, place on the right, add drop shadow. Copy and paste as a new layer element 35, again, resize 60%, flip vertical, place on the left, add a drop shadow. |
10. Open element 68, resize 40%, copy and paste as a new layer, place on the right at the top, add a drop shadow. Feel free to add all the elementsyou wish. |
| 11. You can place the text at the top, use your own , your choice. |
| I hope you enjoyed doing my tutorial, I enjoyed creating it too |
|
 
|
|