|
Snowman Paint
Shop Pro Tutorial
By
Jane's Haven
Email
Terms of Use
Using Versi9on 9,
but will work in many other versions as well. Except
version 7, you may download those selections,
Here
We will be using
selection. You can get them
HERE.
The Broom
HERE. |
| Step 1. Open a new transparent
image, size; 350X525. |
| Step 2. Add a new layer, name
it, left glove, load from disk the, 01-leftglove
selection. Flood fill with, I used a red color; #c00404.
Float selection and add a cutout with the following
settings.
Vertical and Horizontal; 2
Opacity; 85
Blur; 10.00
Color; #450505
Repeat cutout but
change the vertical and horizontal to minus 2.
Deselect.. |
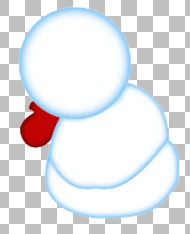
| Step 3.Add a new layer, name
it, body 1, load the, 02-bocy1 selection, flood fill
with white. Float selection and add a cutout with the
following settings.
Vertical and Horizontal; 2
Opacity; 100
Blur; 15.00
Color; #5fb5f7
Repeat cutout,
changing the Vertical and Horizontal to minus 2.
Deselect.
 |
| Step 4. Add a new layer, name
it body 2, load the, 03-body2 selection. Flood fill with
white. Float selection and add the same two cutouts as
in the last step. Deselect. |
| Step 5. Add a new layer, name
it head, load the, 04-head selection, flood fill with
white. Float selection and use the same cutout settings
as the last step, except change the blur to; 25.00.
Deselect.
 |
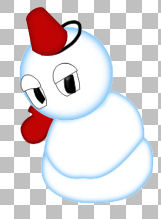
| Step 6.Add a new layer, name
it, hat strap, load the 05-hatstrap selection, flood
fill with black. Add an inner bevel with the following
settings. Deselect.
 |
| Step 7. Add a new layer, name
it, hat, load the, 06-hat selection, flood fill with, I
used red color; #c00404. Invert selection and add a drop
shadow with the following settings.
Vertical and Horizontal; 0
Opacity; 100
Blur; 22.00
Color; #610505
Deselect. |
| Step 8. Add a new layer, name
it eyes 1, load the 07-eyes1 selection, flood fill with
black. Go to selections, modify, contract by 1 and flood
fill with white. Deselect. |
| Step 9.Add a new layer, name
it, eyes2, load the, 08-eyes2 selection, flood fill with
black Add an inner bevel with the following
settings. This is the round bevel preset. Deselect.
 |
| Step 10. Add a new layer, name
it, eye lids, load the, 09-eyelid selection. Flood fill
with black, got to selections, modify, contract by 1 and
food fill with white. Deselect.
 |
| Step 11. Add a new layer, name
it, mouth, load the, 010-mouth selection, flood fill
with black. Deselect. |
| Step 12. Add a new layer, name
it, eye lines, load the 011-eyelines selection,
flood fill with black and deselect. |
| Step 13. Add a new layer, name
it, eye shading, load the, 012-eyeshading selection,
flood fill with color; #b5e4f7. Deselect. |
| Step 14. Add a new layer, name
it, right glove, load the 013-rightglove selection,
flood fill with color;
#c00404. Float selection and add a cutout with the
following settings.
Vertical and Horizontal; 2
Opacity; 85
Blur; 10.00
Color; #450505
Repeat cutout but
change the vertical and horizontal to minus 2.
Deselect.. |
| Step 15. Add a new layer, name
it, nose, load the 014-nose selection. Flood fill with
color; #d26b06. Float selection and add a cutout with
the following settings.
Vertical and Horizontal; 2
Opacity; 81
Blur;10.00
Color; #630b0b
Repeat cutout
changing the Vertical and Horizontal to; minus 2.
Deselect. |
| Step 16. Add a new layer, name
it, broom, load the, 015-broom selection. Open the broom
provided, go to edit, copy, make the snowman image active
and paste into selection. Deselect. |
| Step 17. Add a new layer, name
it, right thumb, load the 016-rightthumb selection.
Flood fill with red;
#c00404. Float selection and add a cutout with the
following settings.
Vertical and Horizontal; minus 2
Opacity; 81
Blur; 10.00
Color;
#630b0b
Deselect. |
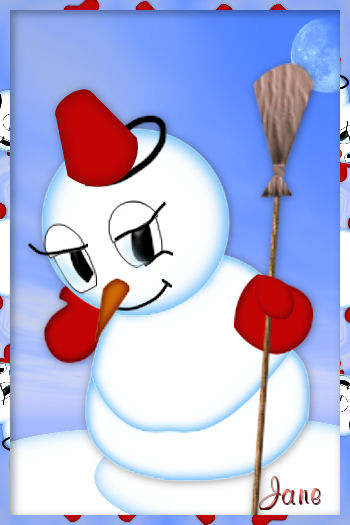
| Our Snowman is complete. You
can merge visible and save as a tube or if you want. To add a background,
you hide the background layer and merge visible. To add
tubes, etc, add new layers. |
|

A Huge Thank You to Cellar for
Testing This Tutorial for me. It is Beautiful. Adding
those Gifts, Shows How We can Dress up and Image. |
©By Jane's Haven, All Rights Reserved, Except Where Otherwise
Stated.