|
Stork |
| Created Using Photo impact version XL
skill Level intermediate.
Author; Jane Davidson
Web site:
Jane's Haven.
Email:
Here
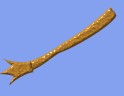
Terms of Use:
here
Tools used: path drawing tool,Path edit, paint brush,
blur tool, transform tool, |
 |
| |
1. new image; open a new image, size;
504X 350, i used background color; #235570. |
|
 |
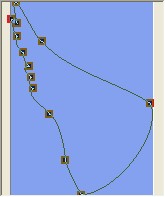
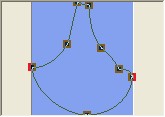
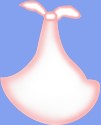
2. stork body; With the path drawing
tool, ellipse, size;258X60, color; white 2D, draw your
shape. Go into path edit and edit the shape like the
example, you will have to add nodes. |
|
 |
3.Wing 1; using the ellipse again same
color, white, draw a shape size;80X130. Go into path
edit and edit the shape as you see at left. |
|
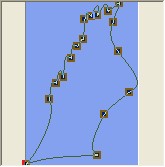 |
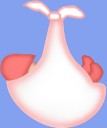
4. wing 2; Draw another ellipse for wing
2. same color, size: 57X132, 2D, Edit the shape
like in the example. right click, arrange, send to back |
|
 |
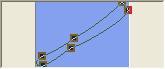
5. leg 1; draw another ellipse
size; 100X 17, color; #A55D13, 3D. edit the shape like
the first one at left. click out of path edit, open easy
palette, in the material attribute gallery, click on
bump find bump; m19, double click to apply the bump to
the leg. open the material options window and change the
border;3, depth; 30. place it on the left of the body. Send to back. |
|
|
6. leg 2; draw another ellipse
size; 100X17, same color, 3D. edit the shape as you see
in the example. if the bump is not already applied,
apply it now. place this one just above the first leg. Send to Back. |
|

 |
7. foot 1.using the same color, bump and
settings. open the shapes panel, scroll down and
use the crown 2 shape. make it any size for now. use the
transform tool
 to
rotate left 90%. use the transform, resize to; 30X35.
place it on the bottom of the first leg. use the rotate
freely to
rotate left 90%. use the transform, resize to; 30X35.
place it on the bottom of the first leg. use the rotate
freely rotate it a bit to the left. See example at left. you
may have to edit the shape so it is the same width as
the leg, where it meets.
rotate it a bit to the left. See example at left. you
may have to edit the shape so it is the same width as
the leg, where it meets.
8.
Foot 2, duplicate this foot and place it on the other
leg, rotate freely a bit to the right.
Select first leg and foot and merge as a single
object, use the blur tool to blur where the foot meets
the leg. do the same to the second foot and leg. |
|


|
9. beak; using the shape a11, color;
#D78808, size; 99X19, 3D chisel, border; 5, depth; 30.
place it on the right of the body, use the transform,
rotate freely to rotate to the right on the right side,
just a little bit. |
|
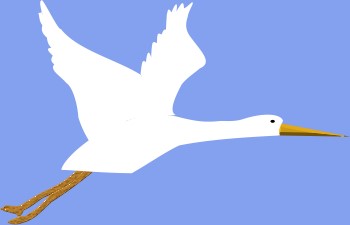 |
10. eye; draw a small ellipse in black,
size 7X5. In 3D and place it on the head.
Opposite is what I
have now. |
|

 |
11.Shading; set your paint brush on the
settings at left. color; #F89292. or any color you
prefer. click on the body, convert to image, go to
effects, creative, paint on edges. 12. select each wing
and convert to image, using the same settings for the
paint brush, paint on edges, both wings. using the
blur tool with the settings you see at left, blur around
the edges of the body and wings. |
|
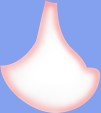 |
13. Baby blanket; draw an ellipse, size;
97X75 pixels, color white, 2D, edit the shape like the
example, you will have to add nodes. 14. add shading;
Use the paint brush with the settings above, except
change the size to; 15. right click, change to image and
paint on edges. place this so the top is at the
top of the beak. Now blur.
Duplicate and send to back and move it slightly to
the left and upwards a bit to give it depth. Use the
format, brightness and contrast, click on the left
bottom window two or three times to darken. |
|

 |
15.knot; draw an ellipse, size;15X11,
color white, paint on edges, change the size to 5.
16.
draw 2 more ellipse, and edit them like in the example
and again, paint on edges. blur both. send behind the
knot. |
|


 |
17.paby hat; I drew an ellipse size;
34X32, color; #FF7F7C, edit the shape as in the example.
when completed, set your paint brush to size; 5,
softedge;50, color #F89292 and paint on Edges, and blur.
send this behind the first blanket. You may have to
rotate the hat slightly to the right, don't want to
break the babies neck. (thanks Nicky) 18.
Booties; Path drawing too, ellipse, same color, size,
22X21. Edit the shape like the example. Use the paint
brush tool, same cooler but change the size to:3 and pOE,
blur. place this on the right of the blanket and send
behind the top blanket.
19. duplicate this booty move it upwards and send
behind the first booty and blanket.
20. head; draw a small circle, size 17X17, or
thereabouts, color;#F9C2AA use the paint brush tool,
size; 5, soft edge 50, color #A96B50, pOE. Place the
head behind the hat and top blanket...You have Completed
my stork tutorial. if you wish to contact me use the
email link at the top. |
|
 |
|
 |
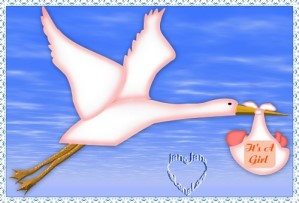
Feel free to right click and save the
award to your own folder. I trust you have completed my
stork tutorial. Please be kind and don't link to my
graphics. |
|
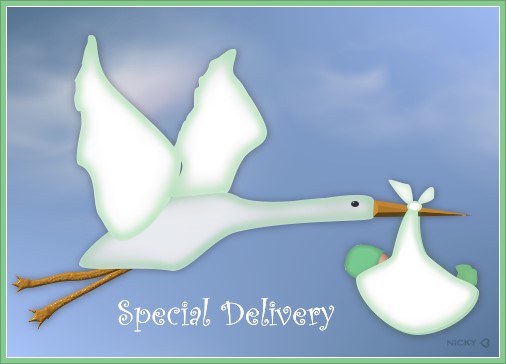
This one was done by Nicky |
|
|
|