|
Angel Tree Topper Paint Shop Pro
Tutorial
I am
using Version 9, most
likely can be done in other versions as well.
by
Jane's Haven
Contact Us
Terms of Use
Get my Selections
Here.
Selections for
PSP Version 7,
here
Unzip them in a folder
of your choice.
Get the hair ,
eyes and
hand images
Here.
Don't forget to save
often. |
|
Open all the
images in PSP. |
| 1.Open a new transparent image,
size; 629X701, we can always resize when completed.
Flood Fill with a color, to see what you're doing. I used;
#68b2f6. |
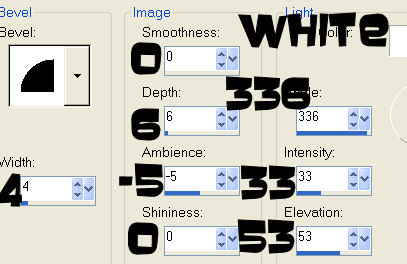
| 2.Add a new layer, name it,
bottom, load from disk the, 01-bottom selection, flood
fill with a silver or gold gradient. I used a silver
gradient, linear style, angle 90, scale; 0. Got to
effects, 3D effects, inner bevel and use the following
settings. Deselect.
You can save this
preset in inner bevel by clicking on the save icon. give
it a name you can remember and click ok. |
| 3. Add a new layer, name it,
Bottom 2, load from disk the, 02-bottom2 selection,
flood fill with the same gradient and add the same inner
bevel. Deselect. |
| 4, Add a new layer, name it,
bottom ring, load from disk the, 03-bottomring, flood
fill with the same gradient. Add the same inner bevel.
Deselect.
|
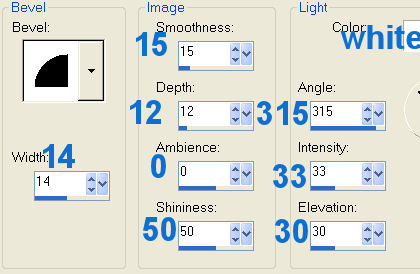
| 5. Add a new layer, name it, star,
load from disk the, 04-star, flood fill with the same
gradient and add an inner bevel with the following
settings. Deselect.
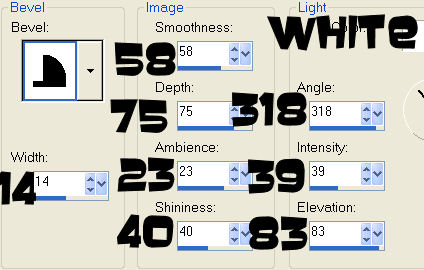 |
| 6. Add a new layer, name it, star
layer, load from disk the, 05-starlayer, flood fill with
the same gradient and add an inner bevel with the
following settings.
The bevel preset number 10
 bevel,
Width; 12, smoothness; 52, depth; 100, ambience; 23,
shininess; 40, color; white, angle; 318, intensity; 39,
elevation; 83, deselect. bevel,
Width; 12, smoothness; 52, depth; 100, ambience; 23,
shininess; 40, color; white, angle; 318, intensity; 39,
elevation; 83, deselect.
 |
| 7. Add a new layer, name it,
wings, load from disk the, 06-wings, flood fill with
white. Selection, float,
and add a cutout with the following settings.
Vertical and Horizontal; 0
Opacity; 56
Blur; 17.00
Color; Black
Deselect. |
| .8. Add a new layer, name it,
skirt, load from disk the,07-skirt, flood fill with;
#ffc0ff . Float selection and add the following cutout.
Vertical and Horizontal; 0
Opacity; 89
Blur; 20.00
Color; #720000
Deselect. |
| 9. Add a new layer, name it,
skirt shading, load the, 08-skirtshading, flood fill
with; #c701c5. Deselect and go to adjust, blur, average, using a
setting of; 9.
 |
| 10.Add a new layer, name it, magic
wand, load from disk the, 09-magicwand, flood fill with
the same gradient and add an inner bevel with the
following settings. Deselect.
 |
| 11. Add a new layer, name it,
left hand, load from disk the, 10-lefthand, flood fill
with; #ffbd95. Float selection and add a cutout with the
settings below.
Vertical and Horizontal; 0
Opacity; 89
Blur; 8.00
Color; #9e4b1e
Deselect.
|
| 12 Add a new layer, name it,
left fingers, load from disk the, 11-leftfingers, flood
fill with the same color as for the hand. Float
selection and add the following cutout.
Vertical and Horizontal; 0
Opacity; 100
Blur; 3.00
Color; #9e4b1e
Deselect.
In the layer
palette, with your mouse pointer, grab the magic wand
layer and move it above the left hand layer. |
| 13. Hi-light the very top layer
and add a new layer, name it,
right hand, load the, 12-righthand, open the right hand
image, click on the top of the right hand image and right click,
copy, go back to the main image and click, paste into
selection and deselect. |
| 14. Add a new layer, name it,
dress collar, load from disk the, 13-dresscollar
selection, flood fill with, #ffc0ff. Float selection and
add a cutout with the following settings.
Vertical and Horizontal; 0
Opacity; 100
Blur; 13.00
Color;
#720000
Deselect. |
| 15. Add a new layer, name it,
face, load from disk the, 14-face, flood fill with,
#ffbd95. Float selection and add a cutout with the
following settings.
Vertical and Horizontal; 0
Opacity; 100
Blur; 10.00
Color; #9e4b1e
Deselect.
|
| 16. Add a new layer, name it,
eyes, load the, 15-eyes . Open the eyes image, click
copy, go back to the original image and click paste into
selection. Deselect. |
| 17. Add a new layer, name it,
nose, load from disk the, 16-nose, flood fill with;
#d36a0d, deselect and got to adjust, blur, average,
setting; 3
. |
| 18 Add a new layer, name it,
lips, load the, 17-lips selection, flood fill with,
#fb8585. Float selection and add a cutout with the
settings below.
Vertical and Horizontal; 0
Opacity; 45
Blur; 2.00
Color; #f10707
Deselect. |
| 19 Add a new layer name it,
hair, load from disk the, 18-hair. Open the hair image
and copy, click back on the main image and paste into
selection and deselect. |
|
I added a new
layer and found a sparkle tube to use for the end of the
wand.
After that I
merged visible all the angel layers by closing all the
other layers. I used the perspective tool and enlarged
only the angel a bit.
I then hid the
background layer and merged visible. Hi-lighted the very
last layer on the bottom to add a background. After that
I resize the entire image.
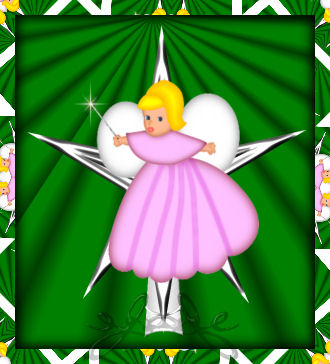
Your Angel Tree
Topper is Completed. |
|
To Save as a
Picture Tube: We used a background so we must
delete this layer and merge visible. You can hide the
background layer and merge visible to use the background
to fill with a color of your choice. |
|
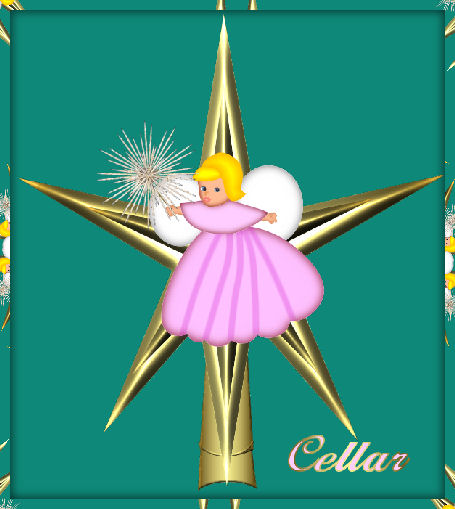
A huge Thank You to My Great Friend
Cellar for Testing this for me. Beautiful work Cellar. |
© by Jane's Haven. All Rights reserved except where otherwise stated.