Watch Dog Paint Shop Pro Tutorial
by
Jane's Haven
Email
Terms of Use
I am using Paint
Shop Pro Version 9. I am reasonable sure it can be done
in other versions as well.
The Selections you
can Download
HERE.
You can get the
binoculars
HERE.
My wood pattern HERE
Unzip the selections
in your PSP selections folder or a folder of your
choice. When you go to load selection click to browse to
the selections folder.
|
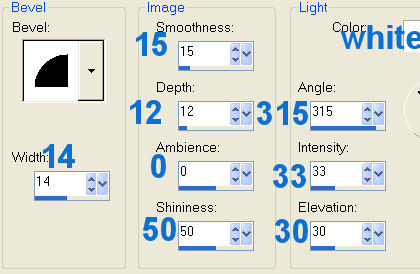
| 1.Open a new transparent image,
size; 575X510. Open the wood pattern. |
| 2,Add a new layer, name it,
fence post. Load from disk the, 01-femcepost selection,
Flood fill with; my wood pattern, angle;10
scale;100. Add
an inner bevel with the following settings. Deselect
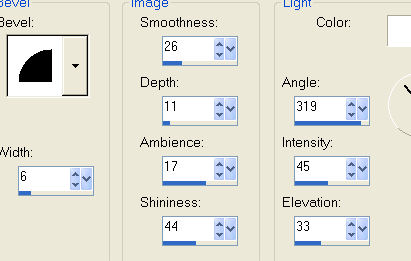 |
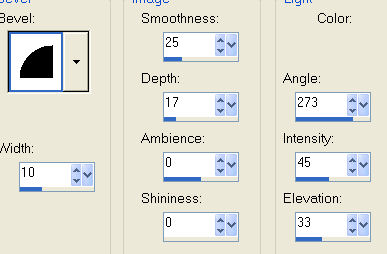
| 3. Add a new layer, name it,
bottom slat edge, load the 02-bottomslatedge selection,
food fill with the wood pattern, set the angel to 90.
Add an inner bevel with the following settings. Deselect
and go to adjust, brightness and contrast, set the
brightness to minus 28, contrast; 0.
 |
| 4. Add a new layer, name it,
bottom slat, load from disk the 04-bottomslat
selection. Flood fill with the wood pattern, with the
angle at 90. Add an inner bevel with the following
settings. Deselect.
 |
| 5. Add a new layer. name it,
top slat edge, load the, 04-topslatedge selection. Flood
fill with the wood pattern, same settings. Add an inner
bevel with the same settings as for the bottom slat edge
in step 3. Deselect and add the brightness and ontast,
with the same settings in step 3. |
| 6. Add a new layer. name it,
top slat, load the 05-topslat. Flood fill with the same
wood pattern and add the same inner bevel as in step 4.
Deselect. |
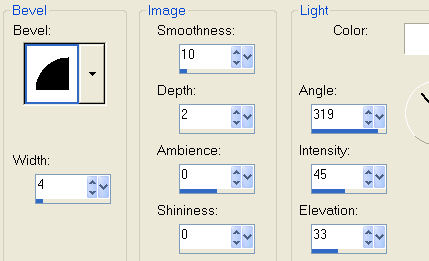
| 7. Add a new layer, name it,
bolts. load from disk the, 06-bolts selection, flood
fill with the wood pattern. Add an inner bevel using the
round preset that came with PSP. The settings are below.
Deselect.
 |
| 8. Add a new layer, name it,
body, load from disk the, 07-body selection. Flood fill
with color; #fcdaad, invert selection and add a drop
shadow with the following settings.
Vertical and Horizontal; 0
Opacity; 80
Blur; 25.00
Color; #5c3906
Deselect.
 |
| 9. Add a new layer, name it,
tail, load the 08-tail selection. Flood fill with color;
#fcdaad. Invert the selection, add a drop shadow with
the following settings.
Vertical and
Horizontal; 0
Opacity; 77
Blur; 16.00
Color; #5c3906
Deselect. Send
the tail under the body layer. |
| 10. Add a new layer, name it,
bottom lip, load the, 09-bottom lip selection, flood
fill with; #fcdaad.
Invert and add the same drop shadow as the last step.
Deselect. |
| 11,Add a new layer, name it,
binoculars, load from disk the, 010-binoculars selection.
Open the binocular image, got to edit, copy and paste
into selection.Deselect. |
| 12. Add a new layer, name it, head, load from disk the, 011-head selection, flood fill
with the same color;
#fcdaad. Invert and add the same drop
shadow as in step 9. Deselect. |
| 13. Add a new layer, name it,
mouth top load from disk the, 012-mouthtop
selection, flood fill with the same color;#fcdaad.
Float selection and add a cutout with the following
settings.
Vertical and Horizontal; 2
Opacity; 82
Blur; 7.00
Color; #5c3906
Repeat the cutout
except change the vertical and horizontal to minus 2.
Deselect. |
| 14. Add a new layer, name it,
collar, load from disk the 013-collar selection, flood
fill with, I used a dark red color;#c00000. Float the
selection and add a cutout with the following settings.
Vertical and Horizontal; 2
Opacity; 82
Blur; 7.00
Color; #890101
Deselect. |
| 15. Add a new layer, name it,
cheeks, load from disk the, 014-cheek selection.
Flood fill with the color; #fcebd6. Float the selection,
add a cutout with the following settings.
vertical and horizontal; 3
Opacity; 82
Blur; 12.00
Color; #5c3906
Repeat the
cutout, changing the vertical and horizontal to minus 3.
Deselect. |
| 16. Add a new layer, name it mouth line, load from
disk the, 015-mouthline selection. Flood fill with
black. Deselect.
 |
| 17. Add a new layer, name it,
eyes, load the 016-eyes selection, flood fill with
black. Deselect. |
| 18. Add a new layer, name it,
nose, load the, 017-nose selection. Set your background
color to; #fcdaad, set your foreground color to;
#c00000, now click on the gradient icon, click on edit
and find, foreground-background and close. Use the style
preset, sunburst. Flood fill. Deselect.
 |
| 19.Add anew layer, name it,
cheek spots, load from disk the, 018-cheekspots
selection. Flood fill with black. Deselect. |
| 20. Add a new layer, name it,
left ear, load the, 019-leftear selection, flood fill
with color; #814d09. Invert selection and add a drop
shadow with the following settings.
Vertical and Horizontal; 0
Opacity; 80
Blur; 15.00
Color; Black
Deselect. |
| 21. Add a new layer, name it
right ear, load the, 020-rightear selection, flood fill
with the same color;#814d09,
invert and add the same drop shadow. Deselect. |
| 22. Add a new layer, name it,
paw shade, load the, 021-pawchade. Flood fill with
color,#814d09. Go to
adjust, blur, average and set the blur to; 5. Deselect. |
| 23. Add a new layer, name it,
tongue, load the 022-tongue selection. Flood fill with
the same sunburst gradient we used for the nose.
Deselect. On the same layer load the,023-tongueshade
selection, flood fill with a red color; #c00000, add the
blur, average set to; 5. Deselect. Move this layer below the mouth
top layer. Using the mover tool, slide the tongue up
under the mouth top layer a bit. |
| 24.Add a new layer, name it
spots, load the 024-spots selection. flood fill with
color;#744a0e and deselect. |
| 25.Add a new layer, name it hip
shade, load the 025-hipshade selection. Flood fill with
color; #744a0e, click twice with the bucket. deselect.
Go to adjust, blur, average with a seeing of;7.
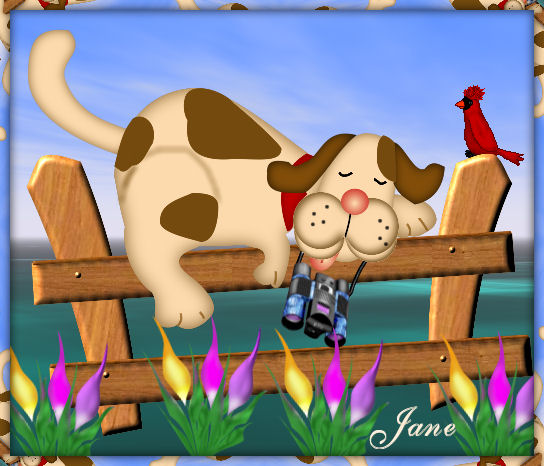
Your watch dog is complete. Merge
visible, if you want to add a background, hide the
background layer, merge visible. Add layers if your
going to add any tubes, etc. |
|
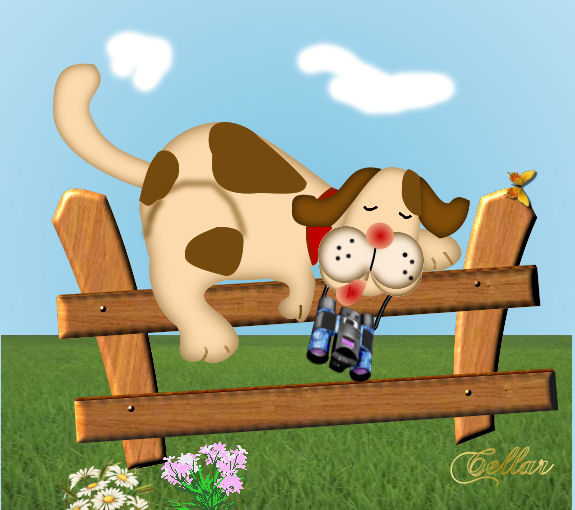
Many thanks again to Cellar for her
help in testing this tutorial. Cellar does great work,
the above image is hers, it is a beauty. |
©by Jane's
Haven. All Rights Reserved except where otherwise stated.


