

This Paint Shop Pro Tutorials is strictly my creations. What you create is yours. Winter Paint Shop Pro Tag Tutorial 
Supplies Needed. My Supplies  A version of Psp, a working knowledge of the program. Plugin,,,,Richard Roseman Grid Generator HERE Free The transparency filter, Here Scroll down to the T's, it's free. Plugin-Carolaine_sensibilty,free, Here
Contact Me
| 1. Open a new transparent image, size, 700X700. |
|---|
| |
|---|
| 2. Select all, add a new layer, open the scenery, copy and paste into selection. Select none |
|---|
| |
|---|
3. Add a new layer above the scenery and flood fill with black. Go to effects, Richard Roseman Grid Generator to open. Use the setting below. Using the transparency filter to eliminate black. 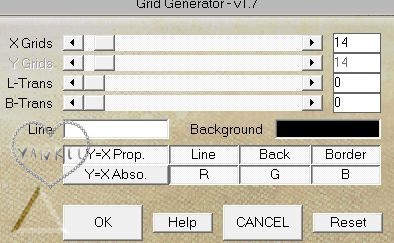
|
|---|
| |
|---|
4. While on the grid layer, select all float and defloat, expand by 1, flood fill with, I used a blue #3a4c87, deselect. Below is what it should look like at this point. 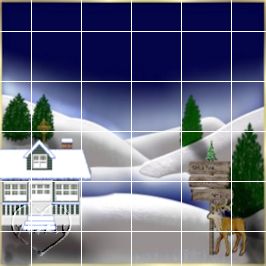 |
|---|
| |
|---|
5. Using the pick tool, grab the grid on the left. center node and push it over to the right, approximately to the 500 mark on the ruler. Staying on the grid layer, use the pick tool, set on perspective, grab at the top left of the grid and pull down as far as you wish. This will make the grid look like an open gate. Below is an example after working the perspective. Duplicate, mirror and move to the left. Add a drop shadow to the original gate, as below. Add the same drop shadow to the left gate but change the V and H to minus 3.  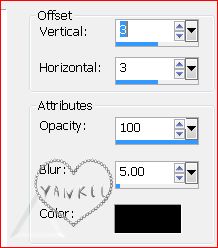
|
|---|
| |
|---|
6. In the layer palette make the scenery layer is highlighted, go to image, resize 95 percent, resize all layer unchecked. Do the same to each side of the gate. Add a new layer, flood fill around the scenery, I used a blue #060849. Using the Carolaine_Sensibilty filter, with the CS-LDots. use the settings below. 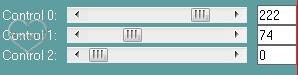
|
|---|
| |
|---|
| 7. Add your main tube, place it on the right or left side, resize to your liking, add your drop shadow. |
|---|
| |
|---|
| 8.Add the copyright if needed and your name. |
|---|
| |
|---|
9. Now for the snow, Open animation shop, I will refer to as AS from now on. Open the snow in AS, go back to PSP, activate the scenery layer and select all, float and defloat, add a new layer above the scenery layer, duplicate the new layer 5 times, for the snow frames. Close all the duplicate layer, leave the original layer, above the scenery layer open, make sure the new layer is highlighted. Go to AS, click on the first snow frame, copy, go back to PSP, click on the title bar of the tag, click paste into selection. 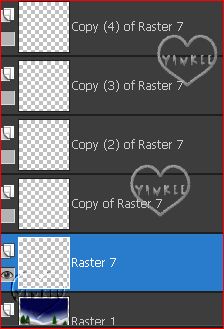
Next close this layer, open the next duplicate layer above and open. Go back to AS, click on frame2, copy, back to PSP, and again go to the title bar of the tag, paste into selection. |
|---|
| |
|---|
| 10.Contnue to do this until you have all frame of the snow in all six layers |
|---|
| |
|---|
| 11. When completed, in PSP, deselect and close all the snow layers except for the bottom snow layer, go to the title bar, right click, click copy merged. Go to AS and paste as a new animation. Go back to PSP, close the first snow layer and open the layer above, copy merged and back to AS, click paste after selected frame. Continue this step until you have all 6 frames in AS. Open Go to frame property, set the time to 10. View animation, if pleased, save as a gif. |
|---|
| |
|---|
| I hope you have enjoyed creating this tutorial. |
|---|
 
|