|
Anticipation Tag
Tutorial

Paint Shop Pro
Tutorial
I used Version X
but I am reasonably sure it can be done in many other
versions as well. This Tutorial is Assuming that you
have a working knowledge of how to use Paint Shop Pro.
by
Jane's Haven
Contact Us
Terms of Use
Supplies
Here
You will also need a
girl tube of your choice.
Unzip the supplies,
put the mask on the PSP Mask folder. |
| 1.Open a new transparent image,650X650 pixels, flood fill with
white. |
| 2. Add new layer, flood fill with,
#dfcc92. |
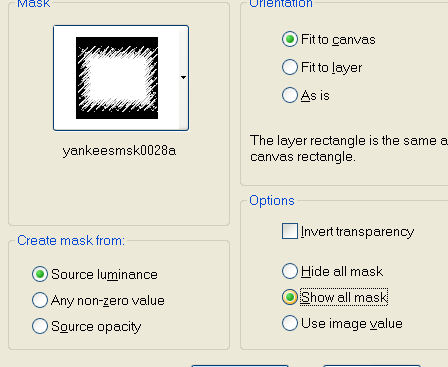
| 3. Go to the bar at the top, open
layers, find, load/save mask, find the yankeemask10,
when it open use these setting and merge group.
 |
| 4.Open the bed room picture, copy
and paste as a new layer in the working image. |
| 5. Open the man tube, copy and
paste as a new layer, place it on the left top corner of
the bed room picture. In the layer, making sure the man
tube layer is active, turn down the opacity to about 55. |
| 6.Open the rose frame, copy and
paste as a new layer in the working image. Check to make
sure it is centered on the picture and check the man
tube to make sure it is visible and not covered by the
frame. |
| 7. Open your lady tube, copy and
paste as a new layer, move it to the right so that it
looks as if it is sitting on the bed. Resize if
necessary. Below is what you should have at this point.
 |
| 8,Add your name and water mark,
any drop shadows you would like, go to edit, copy
merged, open animation shop. In AS go to edit then to
paste as new animation. |
| 8. Still in AS. Go to file in the
menu, click open, browse to the folder where you saved
the supplies, click on the animatedpetals file and open
in AS. |
| 9. There are 24 frames in the
animation, therefore we must have 24 frames of the image
we pasted into animation shop. On the main image, click
on the frame, next, right click in the image and chose
duplicate, left click on the duplicated frame to make
sure it is the only frame selected, then right click and
duplicate, repeat these steps until you have five
frames. Next go to edit,
select all, right click on the image with the five
frames and click the duplicate again. You should now
have ten frames, if so, got to edit, select all, and
right click again and click on duplicate. Now you should
have twenty frames. We need four more, so, left click on
the last frame, to make it the only active frame, then,
right click and duplicate. Repeat the left click
and then right click and then duplicate until you have 3
more frames, which should give you 24 frames. |
| 10.Now go to edit, select all,
make your animated petals active, go to edit, select all
and copy. Back to the main image and go to edit, paste,
paste into selected frame, in the top left corner.
 |
| 11.While the image is selected,
paste the petals again, just under but to the right of
the first petals. |
| 12.Click the preview animation, if
you are satisfied, save as a gif.
 |