|
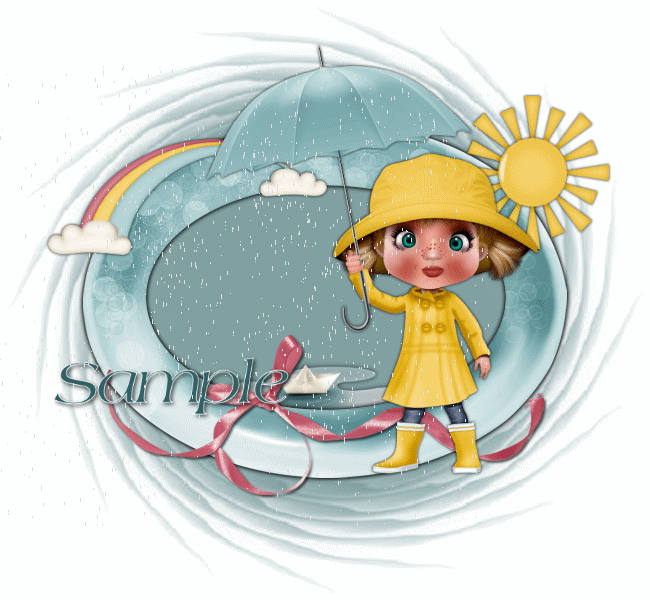
This is what we are making.
Paint Shop Pro
Tutorial
I used Version x5
but I am reasonably sure it can be done in many other
versions as well. You must have some knowledge of
Paint Shop Pro
The tube I am using is is a freebie, if anyone recognizes it, please let me kknow
by
Jane's Haven
Any Questions?
Contact Us.
Supplies you will need.
Filter's EyeCandy 4000
Font of your choice.
Supplies
Use My Fat Pencil to drag to the place you are in the tutorial.
 |
| 1.Open a new tranparent image,size, 650X600. Fill with white. |
| 2. Add a new raster layer, fill with, #80a0a1. Apply the mask, JH-mask6 and merge group. |
| 3. Open the frane, copy and paste as a new layer. |
| 4.Open the ribbon, copy and paste as a new layer. Place at the bottom. Add your drop shadow. |
| 5.Open the rainbow, copy and as a new layer, moove to the upper left of the frame,,add your own drop shadow. |
| 6. Next, open the sun, copy and paste as a new layer, place on the top right, drop shadow. |
| 7. Open the puddle, copy and paste as a new layer, in the layer below the frame. |
| 8.Copy and passte as a new layer the girl tube on top of the frame, drop shadow. |
|
9. Open the boots, cipy and paste as a new layer, place them on the bottom left, drop shadow. |
| 10. Repeat the above with the duckie, add a drop shadow. |
| 11. Lets make iit rain, add your name and copyright if needed. |
| 12. Open animation shop, bacck to PSP, go to edit, copy merged, go to animation shop, paste as a new animation. Open the rain file included in the supplies, note how many frames it has, three. Duplicate the tag until there are 3 frames. Go to the rain file, hold down the control key and the A key to select all and copy. On the tag, control+A key to select all and click paste. Center the rain file and click. |
| 13. Set the frame properties to 10. Now view the tag, if satisfied save as a gif. |
©by Jane's
Haven all Rights Reserved Except Where Otherwise Stated.


