|
This is what we are making.

Paint Shop Pro
Tutorial
I used Version x8
but I am reasonably sure it can be done in many other
versions as well. You must have some knowledge of
Paint Shop Pro
by
Jane's Haven
Any Questions?
Contact Us.
Supplies you will need.
A tube is included in the zip, no
copyright needed
The mask is included in the zip
Font of your choice.
Supplies
Use My Fat Pencil to drag to the place you are in the tutorial.
 |
|
1. Open a new image size 500X500, flood fill with
white. |
|
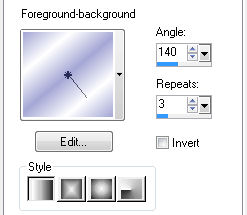
2. Add a new layer, flood fill with a gradient,
foreground color, #a4a7d5, background color white.
open the gradient window click on edit go to foreground
and background, use these settings, angle 140, repeats 3,
linear. Flood fill with the gradient. Add the mask, one
of your own or the mask provided, merge group.
 |
|
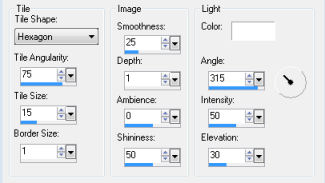
3. On the mask layer, go to effects, texture, tiles,
with the settings below.
 |
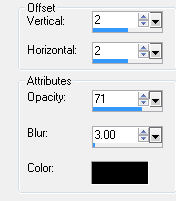
| 4.Using the text tool with the settings
below, using a fat font, I used Big_ Sky_Regular. Write
your text, I used a color from my tube. Add a drop
shadow with the settings below.

 |
| 5. Place the girl tube sitting on the first letter,
you may have to adjust the text, larger or smaller. |
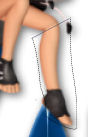
| 6. Using the selection tool, free hand selection
type, draw around the entire right leg starting at the
knee. While selected, cut and paste as a new layer, use
the mover tool to put it in place.
Duplicate once and free rotate left 15 degrees, all
layers unchecked. Using the mover tool, line it up at
the knee. Duplicate the layer, rotate the same
way, line it up. Repeat until you have 3 legs rotated.
Note!!! My eyes are failing therefore, the legs may not
be lined up, may be a little off.
 |
| 7. Now to animate, open animation shop which I will
refer to as AS. close off all legs except the one at the
bottom, go to edit and click on copy merged. Go to AS,
paste as a new animation, back too PSP, close the first
leg and open the next one up. Copy merged, go to AS and
paste after selected frame. repeat until you have all
the legs completed, a number of 4 frames. Hold the
control key down and press the A key to select all
frames. In the menu click on animation, go down the list
and click on frame properties, set the time to 20 and
view the animation. Save as a gif. |
| |
©by Jane's
Haven all Rights Reserved Except Where Otherwise Stated.