Cartoon Lady Tutorial
|
Created with Ulead Photo Impact.
PI
Version-I am using version XL, I am certain it can be done in
earlier versions, up to
PI12.
Skill Level: Intermediate
Author: Jane Davidson
Web Site:
Jane's Haven
Email
Terms of Use:Here
Tools used; Path drawing tool, paint on edges, blur, path
edit, paint brush, air brush, dodge tool, blur tool, burn tool,
smudge tool. |
|
| |
|

|
12. Dress bottom, Ellipse, size; 144X355,
color; #C40000, again follow the bottom part of the dress in path edit. |
|
|
13. Dress Bottom Inset, Go to the layer manager and
click on the eye of the dress bottom layer to close the dress bottom so
we can see the picture, using white or use your own color, and draw an
ellipse over the lighter color shade for the inset of the dress or you
can skip this part, you don't really need it. I used an ellipse in
color red for the eye ring to cover the space near the face.
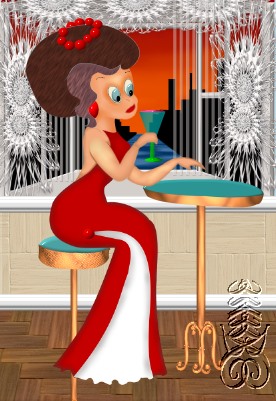
We have finished drawing the main part of the lady, it is time to
give her some shading. |
 |
On the left is an example of what I have at this point.
Right click and select all, pull it off the picture into a new canvas,
save as a ufo. |

 |
14. Shading; In the layer panel find the
hair and click on the eye to close them. Select the head, right click
convert to an image. Set the paint brush with the settings at left,
color; #B37E5D go to the menu effects, Creative and paint on
edges. Using the blur tool with the settings at left, blur the POE. |


 |
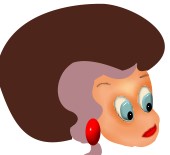
15. Keeping the face selected, using the air brush, with
the settings at left the same color as for the POE.
Shade
on the face around the eyes. Using the Dodge tool
 with
the settings at left, just above where we used the paint brush for the
nose, upwards between the eyes, then blur by taping it once. with
the settings at left, just above where we used the paint brush for the
nose, upwards between the eyes, then blur by taping it once. |

|
16. Eye shading, select the larger ellipse of the
eye, fill it with white, using the paint brush set with size; 2, color;
black, soft edge 0, paint one edges, use the blur tool, size 10, level;
2, soft edge 50, lightly blur around the edge of the eye, do the same
for the other one. |
|
 |
17. Select the next smaller piece of the eye, change to 3D, with
these settings; Border 4, depth 30, 2 direct lights. Repeat for the
other side. 17A. Select the last and smallest part of the eye,
change the color to black, 3D, set the border and depth as far as the
sliders will go, lights 1, direct, use the light bulb to adjust
the light like in the enlarged example at left. Now select the earring
and change it to 3D any setting. |

|
18. Select the lips convert to an
image, using the paint brush size 1, transparency 0, soft edge 0,
paint a line across the center of the lips. Using the dodge tools,
setting at left to lighten under the dark line you just made. |
|
 |
19. Lets fix the eyebrows, with the smudge tool, setting; size;
5, level; 30, soft edge; 50, lightly smudge to smooth the eyebrows a
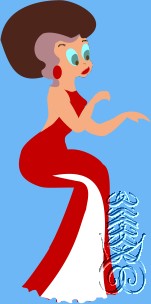
bit. You should have something similar to mine on the left,
it's ok if your is different in some ways. |
|
 |
20. Select the neck, convert to image, use the burn tool, with
these setting; size 20, level 100, soft edge; 50 to darken the neck like
the example. Then use the blur tool, size 10, level; 4, soft edge; 50
and blur the neck. |
|

After retouching. |
21. Select the back, convert to an image, set the paint brush to
size; 5, transparency; 0, soft edge; 50, color;
B37E5D and paint on edges, with the
blur tool same setting as the last step, except change the level to 5
and blur.
Use the eye dropper to select the original color of the skin,
using the paint brush around the part of the back where the it joins the
arm at the top, not all the way around, you might call this the
shoulder.
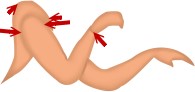
Repeat for the arms and hands. Use the the eye dropper like we did
before, then the paint brush and paint over the POE, around the shoulder
on the arm and wrists. See the example on the left, where the arrows are
located. |
|
 |
Step 22. Select the dress top, right click convert to image, use
the paint brush setting; size 9; transparency 0 soft edge 100, color;
#882626, holding down the shift key and the letter P key at the
same time will paint on edges, mow blur. |
|
 |
23. Select the dress bottom, convert to an image, set the paint
brush as the last step, but change the size to 10 , POE and blur. |
|
 |
23. If you are using the white inset, select it, Paint brush,
size 9, transparency 0, soft edge 50, color; #C2BDBD, Paint on edges and
blur. |
|